If you are an experienced system administrator, and if you focus on network management, you have probably already heard about the Network Manager.
Released in 2004 and developed by Red Hat, the Network Manager is a set of different tools, mostly interfaces, designed to facilitate network management on your system.
If you want to turn on a network adapter, you will probably use the Network Manager in order to achieve that.
Similarly, if you want to edit an existing network card in order to change the IP address assigned to it, you would use the Network Manager again.
In this tutorial, we are going to describe how you can use the various tools in the Network Manager suite in order to manage your networks easily.
After listing the tools embedded in the suite (nmcli, nmtui, nm-applet), we will go through a list of practical use cases for network administrators.
- Arping Command on Linux Explained
- How To Install Samba on Debian 10 Buster
- Complete Node Exporter Mastery with Prometheus | Monitoring Linux Host Metrics WITH THE NODE EXPORTER
Network Manager Architecture
Before diving into the capabilities of the Network Manager, let’s first describe its architecture and how it can communicate with Kernel related modules.
Network Manager API
The first concept to understand is that the Network Manager stands as an API in order to configure the network interfaces on your host.
However, the Network Manager does not work alone : it is part of a process from receiving a network message on an endpoint called a network socket.
A network socket is physically represented by an Ethernet NIC connected to an Ethernet Cable in order to start sharing data over a network.
When an Ethernet cable is plugged, it is first recognized by the udev module which will send a signal to the Network Manager in order to notify that a new cable has been plugged in.
This way, the Network Manager is able to maintain connections but it is also able to expose network availability to other applications.
If you are using Firefox, and if Firefox needs to know the status of a network connection, it can query the Network Manager through DBus in order to get this information.
Network Manager is really a network API that will offer details about network cards, wired or wireless networks available.
It will also provide an easy way to configure your network cards and interfaces with dedicated configuration files.
Network Manager vs ifupdown
Historically, Linux operating systems use to manage network interfaces in a different way, mainly using configuration files located at /etc/network.
In this directory, a file can be used in order to configure network interfaces : the interfaces file.
However, on recent distributions, the “interfaces” file used by ifup and ifdown utilities is not used.
By default, Network Manager is the one managing your network interfaces but the way network is managed can be changed in the Network Manager configuration file.
Precisely, the “managed” parameter in the “ifupdown” section of the NetworkManager.conf file describes if Network Manager is used on your system or not.

Note : “false” means that Network Manager manages your connections and devices, “true” means that you prefer to do it the old way using ifup and ifdown.
About systemd-networkd
On newer systems, systemd is set to handle pretty much everything and network is no exception to the rule.
In some cases, your system may rely on the systemd-network daemon in order to manage interfaces.
Note that, in order to avoid configuration conflicts related to networks, only one networking service should be enabled at one time : whether it is ifupdown, systemd-networkd or Network Manager.
If you are used to manage your networks using the “interfaces” file, you might want to keep doing that, otherwise it is recommended to switch to the Network Manager.
Network Manager Tools
Now that you have a greater understanding of the Network Manager, let’s start enumerating the tools that are provided in this suite.
The Network Manager provides the following tools :
- nmcli : the dedicated command line tool used in order to configure, add, edit and remove connections using the Network Manager;
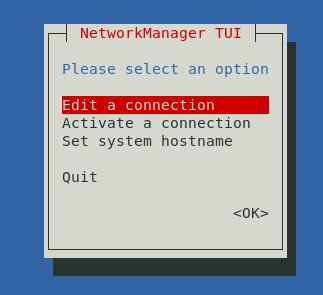
- nmtui : a graphical user interface that provides just a subset of features compated to nmcli. Using nmtui, you can edit a connection, activate a connection or change the hostname of your computer;
- nm-applet : available in GNOME desktop environments, this applet is used as an interface overlay which can be used in order to connect or disconnect from networks.
Note that some distributions may have Network Manager “shortcuts” for the tools described above : nmtui-connect, nmtui-edit or nmtui-hostname.
Most of the time, those utilities are actually simple soft links to the main nmtui utility.
In the following sections, we are going to see how you can use the different tools cited above in order to configure your networks properly.
Network Configuration using nmcli
As described in the previous section, nmcli is a command line utility that can be used in order to monitor your network connectivity, but also to add, edit, delete connections as well as having detailed information about devices on your system.
You can interact with nmcli using the following syntax
$ nmcli <options> <section> <action>
The nmcli has a set of eight sections :
- help : used in order to get general help about the nmcli usage;
- general : used in order to get the status and the global configuration of the Network Manager itself;
- networking : exposes methods in order to shut down the Network Manager or to bring it up again;
- radio : used in order to manage wireless transmissions protocols such as the WIFI or the WAN;
- connection : as its name indicates, this section is used in order to bring interfaces up and down and to add and delete existing connections;
- device : mostly used in order to modify parameters associated with a given device (the interface name for example) or to connect a device using an existing connection;
- agent & monitor : those sections are used to respectively handle secrets and to watch network changes.
Each section described has a set of predefined actions that can be found reading the nmcli documentation (show, add, delete, modify, load and so on)
As an example, if you were to list all connections that are currently active, you would execute “nmcli” with the “connection” section and the “show” action.
$ nmcli connection show
In this case, my host has a wired Ethernet connection on a network adapter named “eth0”.
In the following sections, we are going to see how you can interact with network cards and connections in order to properly configure your system.
Connection Management
When using Network Manager, a connection can be seen as a “network configuration“.
As a consequence, a “connection” has all the information related to the layers 2 (data-link layer) and layers 3 (likely related to IP addressing).
When a connection is used by a device, namely a network adapter on your host, it is set to be “active” or to be “up”.
On the other hand, a connection can be “idle” and now used by any network interface at all : in this case it is set to be “inactive” or “down”
The first key point here is that whenever we are configuring networking on a Linux host, we are essentially configuring connections, that will be bound to devices later on.
Listing Network Connections
In order to list network connections available on your host, you can run the “show” action of the “connection” section.
$ nmcli connection show
Optionally, you can provide the “–active” flag in order to restrict the result to active connections (i.e used by network adapters)
nmcli connection show --active
Adding Network Connections
In some cases, it might be handy to have multiple connections configured.
Say that you are working at two different places : one that uses DHCP in order to assign your IP address (dynamic IP addressing) and one that assigns a static IP to your computer.
In order to achieve that, you can create additional network connections that can be switched on depending on your location.
To add new network connections using Network Manager, you can :
- Add your configuration file to the system-connections directory located at /etc/NetworkManager;
- Add the “nmcli connection” command with the “add” option;
- Use the nm-connection-editor utility that provides a GUI in order to add, modify and delete existing connections.
Using the nmcli command line, you can create a new connection by running the following command
$ sudo nmcli connection add type ethernet ifname eth2
Using nmcli, a new UUID connection will be assigned to your newly created connection and you will be able to start using it to connect to Internet for example.
Modifying connection parameters
One great feature of the nmcli utility is to modify the parameters of your existing connections.
If you want to modify your IP address and switch from DHCP to manual IP addressing, you would also use the nmcli utility to change those parameters.
In order to modify existing connection parameters, you would use the following syntax
$ nmcli connection modify <connection_id> <parameter> <value>
As an example, let’s say that you want your IP address to static and set to the value ‘192.168.1.19’
To achieve that, you would run the following command
$ nmcli connection modify <uuid> ipv4.method manual

$ nmcli connection modify <uuid> ipv4.address 192.168.1.19/24
Note : when changing the IP address, do not forget to set the subnet mask (here /24), otherwise you might get a default mask assigned which will be wrong in most cases.
In order for your changes to be effective, you need to restart your connection by using the “up” and “down” actions of the “connection” section.
$ nmcli connection down <uuid>

$ nmcli connection up <uuid>
Now that your interfaces are restarted, your IP change should be effective.
$ hostname -I

192.168.1.19
Device Management
“Device” is one of the sections of the nmcli utility and it can be used in order to manage network adapters on your host.
Listing Network Adapters
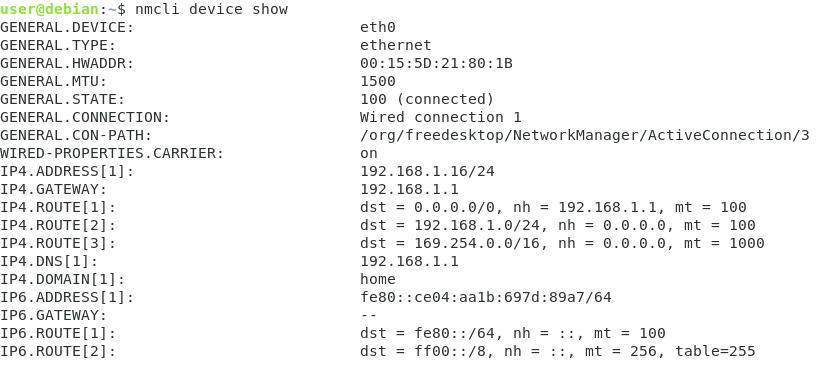
In order to have a listing of the network adapter on your host, you can run the “show” action on the “device” section.
$ nmcli device show
This command describes extensively your network adapter, it lists :
- The device name : assigned by udev when the device was plugged to your computer (eth0 in this case);
- Your device MAC address, referred here as the hardware address;
- The device state : whether it is connected to the network or not;
- The IPv4 address using a CIDR notation (192.168.1.16/24)
- The IPv4 of your subnet gateway (192.168.1.1);
- The IPv4 of your main DNS (192.168.1.1)
Note : here, the gateway is acting as the main DNS but you might have dedicated name servers in your company.
Those characteristics are quite useful if you want to list network cards available on your host and determine whether they are connect or not.
Changing device configuration
In some cases, it might be useful to change device configuration directly.
However, there is a crucial point that you need to remember : you can change your device live, but if you want your changes to be persisted, you need to modify your connection configuration instead.
In short, device configuration changes are temporary.
In order to change your device configuration, you need to execute the “nmcli device” command with the “modify” option and specify the parameter to be changed.
$ nmcli device modify <interface_name> <parameter> <value>

$ nmcli dev mod <interface_name> <parameter> <value>
For example, let’s say that you want to change the IP address of your “eth0” network interface. You also want IP attribution to be static instead of dynamic.
In order to achieve that, you would execute the following command
$ nmcli device modify eth0 ipv4.method manual

Connection successfully reapplied to 'eth0'

$ nmcli dev mod eth0 ipv4.address 192.168.1.19/24

Connection successfully reapplied to 'eth0'
Reapplying parameters
Just to showcase that changes are temporary, if you were to “reapply” parameters to your interface, all your changes would be lost.
Instead, parameters defined in your connection configuration file (in /etc/NetworkManager/system-connections) would be reapplied.
$ nmcli dev reapply eth0

Connection successfully reapplied to 'eth0'
Reinspecting the IP address would give you another IP address from the one you statically assigned in the previous section.
$ hostname -I

192.168.1.18/24
Network Manager Graphical Tools
In this section, we are going to take a look at graphical tools included in the Network Manager suite : nmtui and nm-applet.
Nmtui utility
The nmtui is, as its name describes, a text user interface built in order to facilitate network operations with an easy-to-use user interface.
In order to start with nmtui, simply execute “nmtui” in a terminal shell.
$ nmtui
In this graphical menu, you have three options :
- Edit a connection : where you are able to select network interfaces and modify parameters assigned to them (such as the DNS, the IP address or the gateway address);
- Activate a connection : but also desactivate existing connections. As a reminder, connections are only active or enabled whenever they are assigned to a specific device;
- Set system hostname : like the “hostnamectl” or the “hostname”, you can set the PC name over a network.
Navigating in the nmtui tool is pretty straightforward : you can use keyboard keys to navigate, the ‘Enter’ key in order to confirm your selection and the ‘Escape’ key in order to cancel and go back to the previous screen.
Nm-applet on GNOME
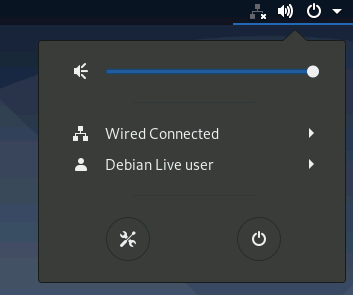
The last application related to the Network Manager is nm-applet : a GUI applet available for GNOME user-interfaces.
The nm-applet tool is an overlay user interface that is available in the top-right corner of your desktop menu.
Using the nm-applet, you can : see existing connections, add, edit and remove them at will.
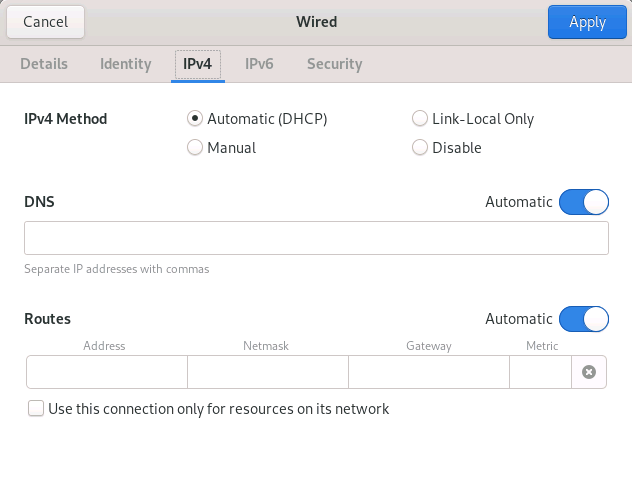
You can see detailed information about the settings of your wired connections and edit them in order tochange your IP address or change the IP attribution method (from DHCP to manual for example)
Conclusion
In this tutorial, you learnt about the Network Manager : a tool on modern distributions that is used in order to create, modify and manage network connections.
You have discovered the tools associated with the Network Manager (namely nmcli, nmtui and nm-applet) and you have learnt how you can use those tools in order to modify your existing connections.
If you are interested in networking or in Linux System Administration, we have a complete section dedicated to it on the website, so make sure to check it out!

