Network File Systems, also shortened NFS, are file systems that can be accessed over the network.
Compared to filesystems that may be local to your machine, network file systems are stored on distant machines that are accessed via a specific network protocol : the NFS protocol.
NFS belongs to the large family of file sharing protocols, among with SMB, FTP, HTTP and many other file sharing protocols.
NFS has its own way of accessing and securing distant filesystems, as well as different ways of securing access to remote filesystems.
In this tutorial, we are going to setup a NFS server on a remote machine and install a NFS client in order to access it.
We are going to configure the NFS server depending on the resource that we want to share, and we are going to see the little gotchas that there is to know about NFS.
What You Will Learn
If you follow this tutorial until the end, you are going to learn about the following concepts :
- How you can setup a NFSv4 server, create a shared folder and export it to remote clients;
- How to install a NFS client and how to bind it to your NFS server;
- How user authentication works on NFS and why NFS authentications is considered weak;
- What is squashing and why you should always enable root_squashing;
- How NFS handles concurrent editing compared to other file sharing protocols.
That’s quite a long program, so without further ado, let’s start by seeing on you can setup your own NFSv4 server.
- How To Install Samba on Debian 10 Buster
- Understanding Hard and Soft Links on Linux | What are Hard & Soft Links in Linux?
- The Definitive Guide to Centralized Logging with Syslog on Linux
Setting up a NFSv4 Server
For this tutorial, we are going to use a standard Kubuntu distribution, but the rest of this tutorial should work the same if you are using another distribution.
$ uname -a

Linux kubuntu 5.3.0-18-generic #19-Ubuntu GNU/Linux
Before installing any packages, make sure that your system is properly configured with the apt command.
sudo apt-get update
Now that your system is updated, you will have to install several packages for your NFS server.
Installing NFSv4 Server
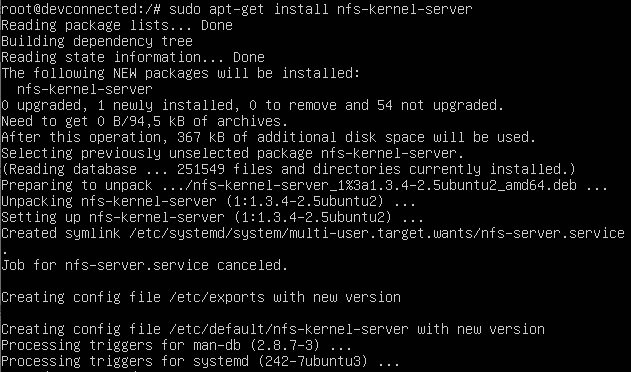
In order to install a NFS server on Linux, you have to install the “nfs-kernel-server” with apt.
$ sudo apt-get install nfs-kernel-server
As you can see from the screenshot above, the nfs-kernel-server comes with some configuration files that you will need to tweak :
- exports : used as a configuration file to set the directories to be exported through NFS;
- nfs-kernel-server : that can be used if you want to setup authentication or modify RPC-related parameters of your NFS server.
For this tutorial, we are only configure to modify the exports file in order to export our directories.
Exporting directories with exports
As stated above, we are going to modify the exports file located in the etc directory in order to share directories.
The syntax for the exports file is pretty straightforward.
The exports file is a column-separated file made of the following fields :
- Local directory : the directory to be exported on the local filesystem;
- IP or hostname of the machine that you want to grant access to;
- NFS options such as rw (for read-write), sync (meaning that changes done are directly flushed to disk)
First, you need to create a directory that will be exported on your system. You obviously don’t have to create it if the directory already exists on your machine.
$ sudo mkdir -p /var/share
For now, you can let root as the owner and as the group owning the file, but we will modify it later on depending on the permissions we want for this shared folder.
Now that your shared folder is created, you will need to add it to the exports file in order to be exported.
Head back to your /etc/exports file and add the information we specified in the bullet-list above.
In the first column, you need to specify the folder to be exported which is the share folder we just created.
Next, you have to specify the IP or hostnames that can mount this directory locally.
In this case, we chose to have a network IP set in the exports file, but it might be different for you.
In order to export all directories specified in the “exports” file, you need to use the “exportfs” command with the “-a” option for “all”.
$ sudo exportfs -a
Next, you can verify that your folders were correctly exported by running the “exportfs” command with the “-v” option for “verbose”.
$ sudo exportfs -v
As you probably noticed, some options that were not specified in the exports file were set by the NFS server by default :
- rw : read and write operations are authorized on the volume (this option was originally specified in the file);
- wdelay : the NFS server will induce a small write delay if it suspects that multiple write operations are currently performed at the same time;
- root_squash : the “root” account will be “squashed” to the anonymous user by default. If you don’t what squashing is, you can read about it in the next sections;
- no_subtree_check : by default, the NFS server will check that the operation requested is part of the filesystem exported on the server;
- sec=sys : by default, NFS will use the credentials set on the server. If your system uses local authentication, those credentials will be used, but if NIS is used, it will be used as the authentication system;
- secure : this option verifies that requests originate from a port lower than 1024 (as a reminder, NFS client requests originate from port 111);
- no_all_squash : except for the “root” account, other users are not squashed when interacting with the NFS server.
Customize Firewall Rules for NFS
In order for our clients to connect to our NFS server, you will need to make sure that the firewall is configured to accept NFS connections.
As a quick reminder, NFS runs on port 2049 on the server.
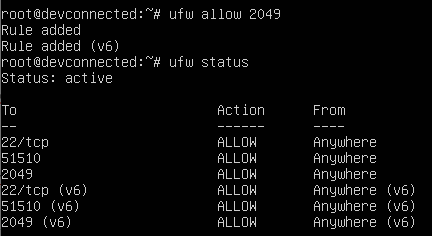
For Debian and Ubuntu, you are probably running an UFW firewall (you can verify it with the “ufw status” command)
To allow NFS connections to your server, run the”ufw” command as root and allow connections on port 2049.
$ sudo ufw allow 2049
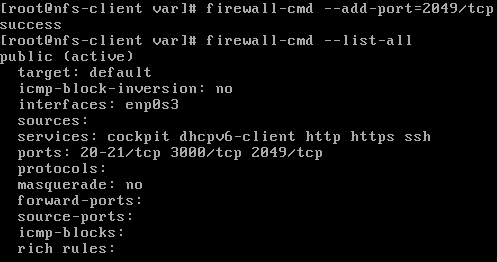
On the other hand, if you are running a Red Hat or a CentOS distribution, you will have to tweak the “firewalld” built-in firewall.
$ sudo firewall-cmd --add-port=2049/tcp
Finally, make sure that your network adapter is correctly exposing the 2049 port to the outside world with the “netstat” command.
$ netstat -tulpn | grep 2049
Okay, now that you have made sure that your NFS server is correctly up and running and that your shares are exported, let’s see how you can configure your NFS clients.
Configuring NFSv4 Clients
Configuration on the client is pretty straight-forward, but you are going to need specific packages to mount NFS partitions.
Mounting NFS partitions on clients
First, you need to install the “nfs-utils” package in order to be able to mount NFS packages.
You obviously need to have sudo privileges in order to install new packages. Here are some tutorials for Debian/Ubuntu and CentOS/RHEL.
$ sudo apt-get install nfs-utils

$ sudo yum install nfs-utils
Now that the package is installed, you can simply mount the partition using the following syntax
$ mount -t nfs <dest_ip_or_hostname>:<remote_path> <mount_point>
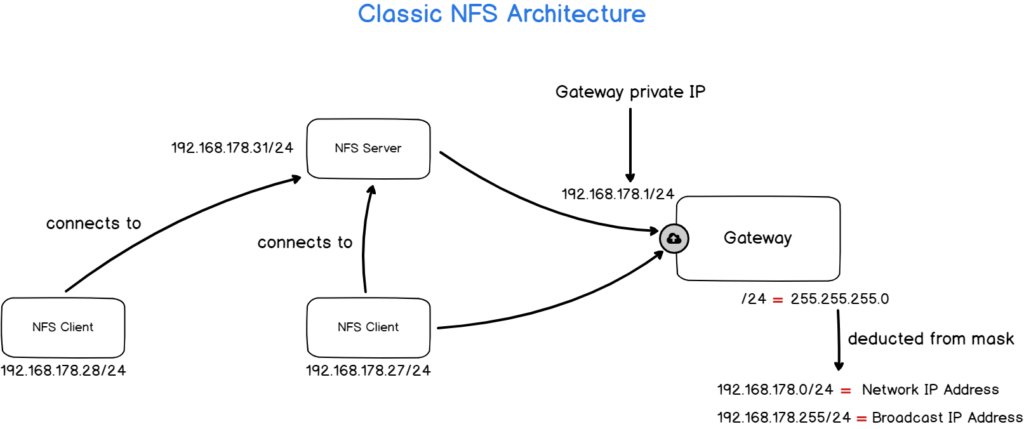
For example, let’s say that your NFS server is located on the 192.168.178.31/24 IP address and that you want to share the /var/share folder on the server.
To export this folder, you would write the following command
$ sudo mount -t nfs 192.168.178.31:/var/share /var/share
The NFS client troubleshooting is not very practical, however it your terminal hands, it probably means that you cannot reach the destination host.
If the command executes successfully, you should be able to list your new mount point using the df command.
$ df -H
Creating new files on the NFS volume
As you probably remember from the last section, we have seen that our NFS volume is configured to squash the root account by default but no other users.
Furthermore, the shared folder is owned by root and by the root group.
If you try to create new files on this volume, you will get a permission denied error, even when trying to create them with sudo.
Why?
The client account does not belong to the “root” group on the server, and if you try to create a file as root on the client, you will be squashed to the anonymous account.
A Word on NFS User Management
Before configuring our server and client in order to share folders properly, let’s have a quick review on how user management works on NFS volumes.
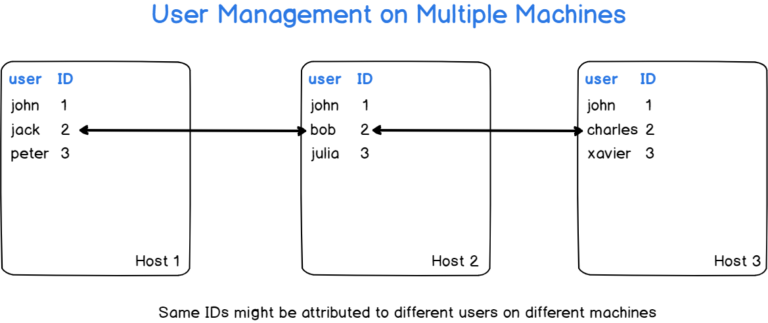
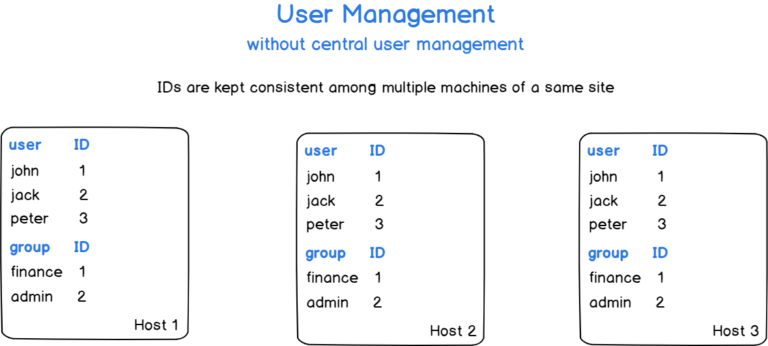
As you probably learnt in our previous tutorials, a user is identified by a user ID (also called UID) and this UID is unique on a machine but it won’t be unique on multiple machines of a same site.
However, if your system is not configured to work with a central user management system (such as NIS, OpenLDAP, or Samba), your user IDs might conflict on the systems that you are operating on.
In this case, if we consider that you are not having a central management system, we will simply state that you are keeping consistent user list among systems.
Now that user and groups are made consistent among hosts, let’s create a group that will be able to add and delete files to the folder.
Creating a group for NFS sharing
In this tutorial, we are going to assume that “administrators” are able to add and delete files on this folder.
First, on the server, use the “groupadd” command in order to create this new group
$ sudo groupadd administrators
You can then change the group owning your NFS share to be “administrators“
$ sudo chown :administrators /var/share
On the server, add the permitted users to the group you just created.
$ sudo usermod -aG administrators <user>
You don’t have to re-export your shared drives, you can simply start creating files now that permissions are properly configured.
On the client, let’s create a new file in the shared drive using the touch command.
$ cd /var/share && touch file-example
On the server, you will be able to see that your file was correctly created.
Awesome!
You successfully created a NFS volume and you shared it with client machines.
Persistent NFS mounts with fstab
As you already know from previous tutorials, mounting a drive on Linux using the mount command does not make it persistent over reboots.
In order to make your mounts persistent, you need to add them to the fstab file.
As a privileged user, edit the fstab file and add a line for your NFS drive
#
# /etc/fstab
# Accessible filesystems, by reference, are maintained under '/dev/disk'.

<ip_address>:<remote_path>   <mountpoint>  nfs  <options>  0   0
For example, given the NFS volume created before on “192.168.178.31” on the “/var/share” path, this would give
#
# /etc/fstab
# Accessible filesystems, by reference, are maintained under '/dev/disk'.

192.168.178.31:/var/share  /var/share  nfs  defaults  0   0
If you are using a systemd based system, you can reload dependent daemons by running the daemon-reload command
$ systemctl daemon-reload
Awesome!
You can now reboot your client machine and verify that your drive was correctly mounted at boot.
Going Further with NFS
In this section, we are going to discuss advanced topics about NFS, specifically how concurrent editing is handled and how you can tweak your NFS configurations to specific client hosts.
Concurrent Editing
When using NFS, you will probably end up editing some files along with multiple other users.
Natively, the NFS server won’t prevent you from editing the same file.
If you are using vi as a text editor, you will be notified that some modifications are already performed by another user (via a swp file).
However, NFS file swaps won’t prevent you from editing the file : it will just display a warning message on the files currently being edited.
Moreover, if you are using other text editors, no “swp” files will be created and the file will have the content of the last modification performed.
Note that there is a way to lock files locally using the “local_lock” parameter on the client-side, you can check the Linux documentation if you are interested in this option.
Exporting folders to specific client IP addresses
In some cases, you may need to export a folder to specific clients on your subnet.
In order to determine the IP address of your client, head over to the client machine and use the “ip” command with the “a” option for address.
$ ip a
As you can see, my client host has two interfaces : the loopback interface (or localhost) and one network adapter named “enp0s3”.
The latter has an IP address already assigned to the interface which can be seen on the “inet” line : 192.168.178.27/24.
If you want to export your folders to an entire subnet, you can specific the subnet IP : as a consequence, every IP on the subnet will be able to export your folder.
Similarly, it is possible to check the hostname of the client machine in order to export it later on the server.
$ hostname
Back to the exports file, you can choose to have one or multiple IP addresses exported or to export a machine by its hostname.
NFS monitoring
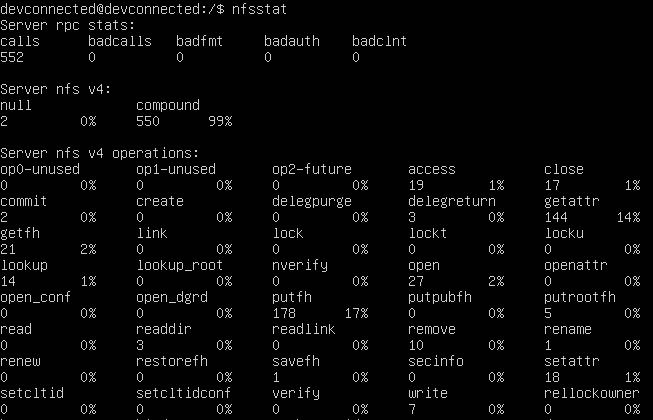
When installing the nfs-common package, you will also end up installing the “nfsstat” utility which is a program that exposes NFS statistics.
Using nfsstat, you will be able to see the total number of operations done on your NFS server as well as the current activity.
Conclusion
In this tutorial, you learnt how you can setup a NFSv4 server easily using the nfs-kernel-server utility.
You also learnt how you can mount the drives on the clients and about the different options that you have to tweak your NFS mounts.
Finally, you went in-depth about NFS drives and learnt how user management is done among multiple host machines and how you should setup your own user management system.
If you are interested in Linux System administration, we have a complete section dedicated to it on the website, so make sure to check it out!
