In our previous tutorials, we have seen that implementing LVM volumes can be very beneficial in order to manage space on your host.
The Logical Volume Management layer exposes an API that can be used in order to add or remove space at will, while your system is running.
However, there is another key feature exposed by LVM that can be very beneficial to system administrators : LVM snapshots.
In computer science, snapshots are used to describe the state of a system at one particular point in time.
In this tutorial, we are going to see how you can implement LVM snapshots easily.
We are also going to see how you can backup an entire filesystem using snapshots and restore it at will.
Prerequisites
In order to create LVM snapshots, you obviously need to have at least a logical volume created on your system.
If you are not sure if this is the case or not, you can run the “lvs” command in order to display existing logical volumes.
$ lvs
In this situation, we have a 3 GB logical volume created on our system.
However, having a 3 GB logical volume does not necessarily mean that the entire space is used on our system.
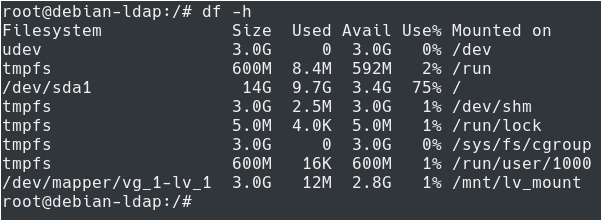
To check the actual size of your logical volume, you can check your used disk space using the “df” command.
$ df -h
Note : your logical volume needs to be mounted in order for you to check the space used..

If you are not sure about mounting logical volumes or partitions, check our tutorial on mounting filesystems.
As you can see here, the logical volume has a 3 GB capacity, yet only 3.1 MB are used on the filesystem.
As an example, let’s say that we want to backup the /etc folder of our server.
$ cp -R /etc /mnt/lv_mount
Now that our configuration folder is copied to our logical volume, let’s see how we can creating a LVM snapshot of this filesystem.
- How To Add Swap Space on Ubuntu 20.04
- How To Encrypt Root Filesystem on Linux
- Logical Volume Management Explained on Linux
Creating LVM Snapshots using lvcreate
In order to create a LVM snapshot of a logical volume, you have to execute the “lvcreate” command with the “-s” option for “snapshot”, the “-L” option with the size and the name of the logical volume.
Optionally, you can specify a name for your snapshot with the “-n” option.
$ lvcreate -s -n <snapshot_name> -L <size> <logical_volume>
Note : you won’t be able to create snapshot names having “snapshot” in the name as it is a reserved keyword.

You will also have to make sure that you have enough remaining space in the volume group as the snapshot will be created in the same volume group by default.
Now that your snapshot is created, you can inspect it by running the “lvs” command or the “lvdisplay” command directly.
$ lvs

$ lvdisplay <snapshot_name>
As you can see, the logical volume has a set of different attributes compared to the original logical volume :
- s : for snapshot, “o” meaning origin for the original logical volume copied to the snapshot;
- w : for writeable meaning that your snapshot has read and write permissions on it;
- i : for “inherited”;
- a : for “allocated”, meaning that actual space is dedicated to this logical volume;
- o : (in the sixth field) meaning “open” stating that the logical volume is mounted;
- s : snapshot target type for both logical volumes
Now that your snapshot logical volume is created, you will have to mount it in order to perform a backup of the filesystem.
Mounting LVM snapshot using mount
In order to mount a LVM snapshot, you have to use the “mount” command, specify the full path to the logical volume and specify the mount point to be used.
$ mount <snapshot_path> <mount_point>
As an example, let’s say that we want to mount the “/dev/vg_1/lvol0” to the “/mnt/lv_snapshot” mount point on our system.
To achieve that, we would run the following command :
$ mount /dev/vg_1/lvol0 /mnt/snapshot
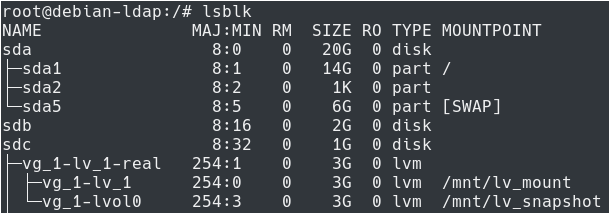
You can immediately verify that the mounting operating is effective by running the “lsblk” command again.
$ lsblk
Backing up LVM Snapshots
Now that your snapshot is mounted, you will be able to perform a backup of it using either the tar or the rsync commands.
When performing backups, you essentially have two options : you can perform a local copy, or you can choose to transfer archives directly to a remote backup server.
Creating a local LVM snapshot backup
The easiest way to backup a LVM snapshot is to use the “tar” command with the “-c” option for “create”, the “z” option in order to create a gzip file and “-f” to specify a destination file.
$ tar -cvzf backup.tar.gz <snapshot_mount>
In our case, as the snapshot is mounted on the “/mnt/lv_snapshot” mountpoint, the backup command would be :
$ tar -cvzf backup.tar.gz /mnt/lv_snapshot
When running this command, a backup will be created in your current working directory.
Creating and transferring a LVM snapshot backup
In some cases, you own a backup server that can be used in order to store LVM backups on a regular basis.
To create such backups, you are going to use the “rsync” command, specify the filesystem to be backed up as well as the destination server to be used.
# If rsync is not installed already, you will have to install using apt
$ sudo apt-get install rsync

$ rsync -aPh <snapshot_mount> <remote_user>@<destination_server>:<remote_destination>
Note : if you are not sure about file transfers on Linux, you should check the tutorial we wrote on the subject.
As an example, let’s say that the snapshot is mounted on the “/mnt/lv_snapshot” and that we want to send the snapshot to the backup server sitting on the “192.168.178.33” IP address.
To connect to the remote backup server, we use the “kubuntu” account and we choose to have files stored in the “/backups” folder.
$ rsync -aPh /mnt/lv_snapshot kubuntu@192.168.178.33:/backups
Now that your logical volume snapshot is backed up, you will be able to restore it easily on demand.
Restoring LVM Snapshots
Now that your LVM is backed up, you will be able to restore it on your local system.
In order to restore a LVM logical volume, you have to use the “lvconvert” command with the “–mergesnapshot” option and specify the name of the logical volume snapshot.
When using the “–mergesnapshot”, the snapshot is merged into the original logical volume and is deleted right after it.
$ lvconvert --mergesnapshot <snapshot_logical_volume>
In our case, the logical volume snapshot was named lvol0, so we would run the following command
$ lvconvert --mergesnapshot vg_1/lvol0
As you probably noticed, both devices (the original and the snapshot can’t be open for the merge operation to succeed.
Alternatively, you can refresh the logical volume for it to reactivate using the latest metadata using “lvchange”
$ lvchange --refresh vg_1/lv_1
After the merging operation has succeeded, you can verify that your logical volume was successfully removed from the list of logical volumes available.
$ lvs
Done!
The logical volume snapshot is now removed and the changes were merged back to the original logical volume.
Conclusion
In this tutorial, you learnt about LVM snapshots, what they are and how they can be used in order to backup and restore filesystems.
Creating backups on a regular basis is essential, especially when you are working in a medium to large company.
Having backups and being able to restore them easily is the best way to make sure that you will be able to prevent major data loss on your systems.
If you are interested in Linux System Administration, we have a complete section dedicated to it on the website, so make sure to check it out!


