For the system administrator, checking that disks are working properly is a big concern.
In many cases, you will have to list all the disks available on your computer, with their sizes, in order to make sure that they don’t run out of space.
If they were to run out of space, you could essentially have your server down, preventing all your users from accessing it.
In this tutorial, we are going to see how you can easily list disks available on your Linux machine.
Prerequisites
For some of the commands used in this tutorial, you will need administrator rights in order to have the full output of the command.
In order to check that you have sudo rights, you can execute the “sudo” command with the “-l” option.
$ sudo -l
If you see matching entries, it means that you are a privileged account on this machine.
However, if you are notified that you “can’t run sudo on this computer“, have a read at our dedicated tutorials for Ubuntu or CentOS (RHEL equivalent).
- How To Install Docker on Ubuntu 18.04 & Debian 10
- How To Add A User to Sudoers On CentOS 8 | Centos 8 Add User to Group
- Complete Node Exporter Mastery with Prometheus | Monitoring Linux Host Metrics WITH THE NODE EXPORTER
List Disks on Linux using lsblk
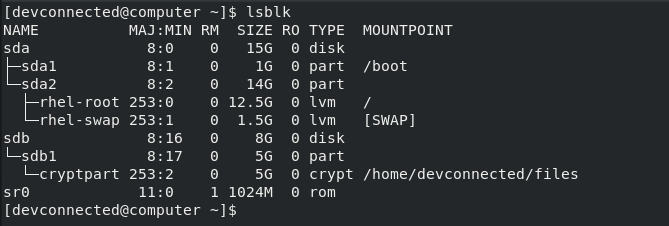
The easiest way to list disks on Linux is to use the “lsblk” command with no options. The “type” column will mention the “disk” as well as optional partitions and LVM available on it.
$ lsblk
Optionally, you can use the “-f” option for “filesystems“. This way, your disks will be listed as well as partitions and filesystems formatted on them.
$ lsblk -f
By executing the “lsblk” command, you are presented with multiple different columns :
- Name : the name of the device. It is quite important for you to know that Linux devices have a specific prefix depending on the nature of the device. “sd” in this case refers to SCSI devices but it is also short for SATA connections as most drives use SATA nowadays;
- Filesystem type : if your partition contains a filesystem, it should be listed in this column (xfs, swap or encrypted devices);
- Label : in some cases, in order to avoid using a UUID, you can choose to have a label for your device;
- UUID : a universal unique identifier. This identifier should be unique worldwide and uniquely identify your device;
- Mountpoint : if your filesystem is mounted, you should be able to see the actual mountpoint.
Awesome, you successfully listed your disks on Linux using “lsblk”.
However, in some cases, you are interested in listing your disks with the actual hardware information linked to it.
If I want to remove a disk from my Linux machine, knowing the actual physical port or the vendor can be quite useful.
List Disks Information using lshw
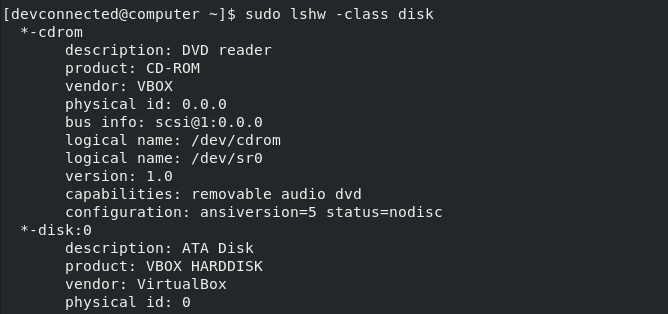
In order to list disk information on Linux, you have to use the “lshw” with the “class” option specifying “disk”. Combining “lshw” with the “grep” command, you can retrieve specific information about a disk on your system.
$ sudo lshw -class disk

$ sudo lshw -class disk | grep <disk_name> -A 5 -B
As you can see, by running the “lshw” with no grep filters, you are presented with all the disks available on your computer.
If you want to target a specific disk on your computer, you can “pipe” the command with “grep” in order to only list the disks that you want.
As you can see, using this command, you have way more information about your disks : the description, the product and its vendor as well as the actual bus info (where it might be plugged on your mother board).
Using this information, you can unplug it and replace it with another one very easily.
Awesome, you know how to list your disk information using “lshw” now.
Alternatives to lsblk : fdisk or hwinfo
The “lsblk” command is not the only command that you can use in order to have a listing of your disks on Linux. There are two other commands : fdisk (that is often used for partitioning) and hwinfo.
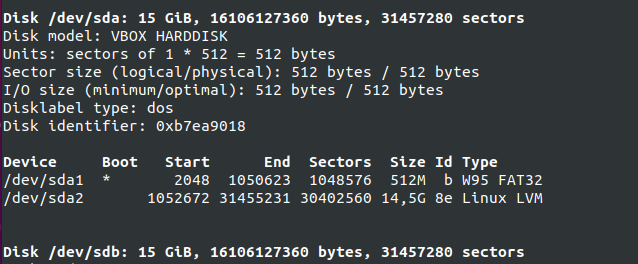
First, if you use the “fdisk” command with the “-l” option, you will be presented with all the partitions available on your machine as well as disks.
$ sudo fdisk -l
As you can see there, you have a very detailed description of your main disk. You can even verify the partitions available on it as well as the bootable flag for example.
However, “fdisk” is not the only way for you to list disks, you can also use the “hwinfo” command with the “–disk” option.
$ sudo hwinfo --disk
Using the “hwinfo” command without any options is quite hard to read. Luckily for you, there is an option that you can use in order to restrict the output to the disk list.
In order to achieve that, you have to use the “–short” option.
$ sudo hwinfo --disk --short
As you can see, the output is quite concise but it gives you a clear idea on disks available.
Finally, for advanced system administrators, you can have a look at the “/dev/disk” folder.
$ ls -l /dev/disk/
In this folder, you can check the “by-id” folder if you are looking for disks or the “by-uuid” one if you are looking for partitions.
$ ls -l /dev/disk/by-id
List Disk Using Graphical Interface
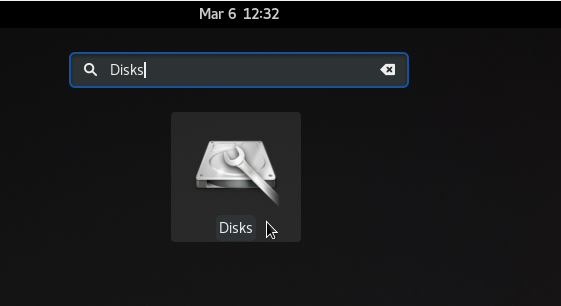
To list disks on Linux using the graphical interface, you have to go to the “Activities” and look for a program called “Disks”.
When in the “Activities” menu, you can type “Disks” and look for an output similar to the one depicted below.
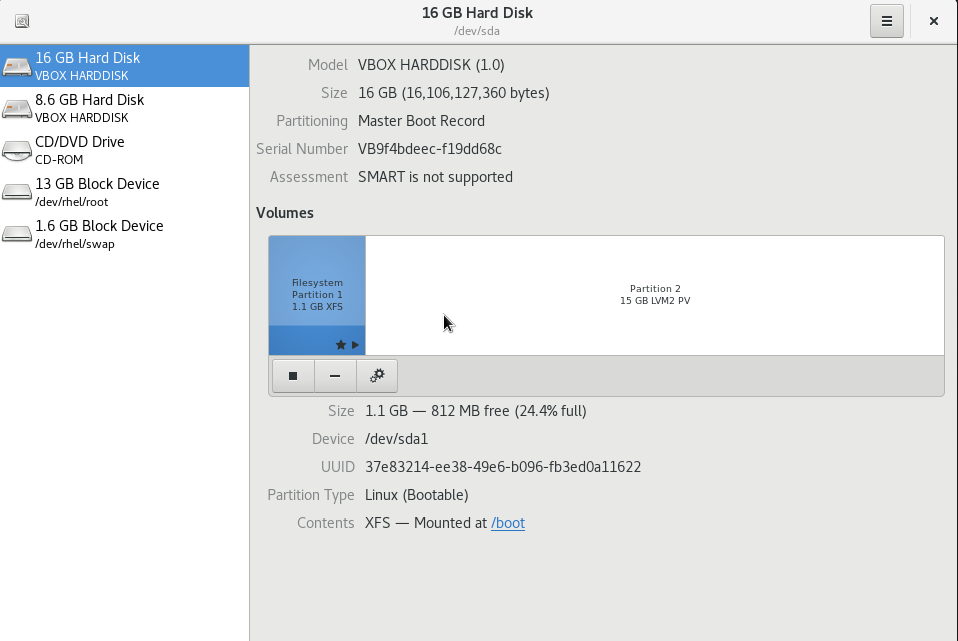
When clicking on “Disks”, you will be presented with the list of disks available on your Linux machine.
As you can see, in the “Disks” window, you have the “hard disk” as well as “block devices” which are the LVM devices that you may have created during the distribution installation.
When clicking on a specific disk, you can see its disk size, the serial number as well as the partitions and the contents that may be stored on it.
Great! You now have the list of disks that are plugged on your computer.
Conclusion
In this tutorial, you learnt how you can easily list your disks on Linux using the “lsblk” command.
You have learnt that the same result can be achieved using many different commands : hwinfo, fdisk or lshw.
If you read this tutorial in order to learn how you can see your disk usage on Linux, you should read our tutorial on the subject.
If you are interested in Linux System Administration, we have a complete section dedicated to it, make sure to have a look.

