If you are working in a medium to big-sized company, it is quite likely that you are working with many other system administrators.
As you are performing your sysadmin tasks, some users may try to connect to your server in order to perform their daily tasks.
However, in some cases, you may find that something has changed on your server. As a consequence, you are wondering who performed the change.
Luckily for you, there are many ways to find who last logged in on your server.
In this tutorial, you will learn about the different useful commands that you can use in order to check the last logins on your computer.
Find Last Login using last
The easiest way to find the last login on your Linux computer is to execute the “last” command with no options. Using this command, you will be presented with all the last logins performed on the computer.
$ last

# To check the last ten login attempts, you can pipe it with "head"

$ last | head -n 10
As you can see, by default, the output is truncated : the “devconnected” user is only displayed as “devconne” with simply using the last command.
If you find last logins using complete usernames and hostnames, you have to append the “-w” option or “–fullnames“.
$ last -w

$ last --fullnames
Last Command Columns
When taking a look at the last command, the output can be a bit confusing. There are many columns but we don’t exactly know what they stand for.
- Understanding Processes on Linux | Types of Process in Linux | Creating, Listing, Monitoring, Changing Linux Processes
- Monitoring Linux Processes using Prometheus and Grafana | Prometheus & Grafana Linux Monitoring
- Access Control Lists on Linux Explained | Linux ACL Cheat Sheet
First of all, there is a difference between user login and reboots.
As you can see, user logins start with the name of the user that connected to the computer. On the other hand, “reboot” logs obviously start with the “reboot” keyword.
User Log In Columns
For user logs, the meaning of the different columns is the following :
- Username : the username who connected to the computer;
- TTY : the index of the TTY used by the user in order to connect to the computer. “:0” denotes that the connection is local and you may use the “tty” command in order to find the device used by the user;
$ tty

The user is using /dev/pts/0 to interact with the system
- The name of the display : as X is used as the display server on every machine, it may use a local display (:0, :1 and so on) or a remote display. If you are interested in running graphical applications remotely, you may read our guide about the X protocol;
- Hour of the login : starting the server is quite different from logging into it. This hour represents the time where the password was actually provided in the interface;
- Login status : either you are “still logged in” or “down” with the duration of the session.
For example, in the following example, the session duration was twelve minutes.
Pseudo reboot columns
On every reboot, your system adds a new line to the current list of reboots performed on your computer.
Those special lines, starting with “reboot“, have the following columns :
- Reboot : specifying that this is not a log in but rather a system reboot;
- Details about the reboot : in this case it was actually a “system boot” meaning that the system just started;
- Kernel version : the kernel version loaded when booting up the system. It might be different if you host different version of the kernel on your boot partition.
- Hour of the boot : the hour represents the time of the system boot. It is either followed by a “still running” indication or the end hour followed by the session duration in paranthesis.
Now that you have seen how you can list all last logins on your server, let’s see if you are interested in bad login attempts.
Find Last Login By Date
In some cases, you may be interested in login that were made since or until a specific date in the past, or in the last five minutes.
To find the last login by date, execute the “last” command with the “–since” command and specify the date to find the last logins for.
Similarly, you can use the “–until” command in order to find login attempts made until a given date in the past.
$ last --since <date>

$ last --until <date>
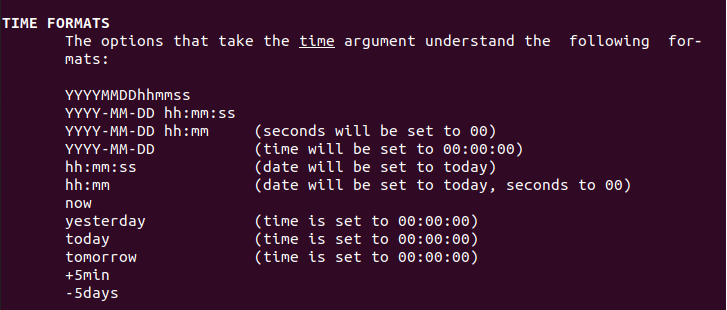
So what are the dates that you can use in order to search?
Date formats are specified in the last documentation page.
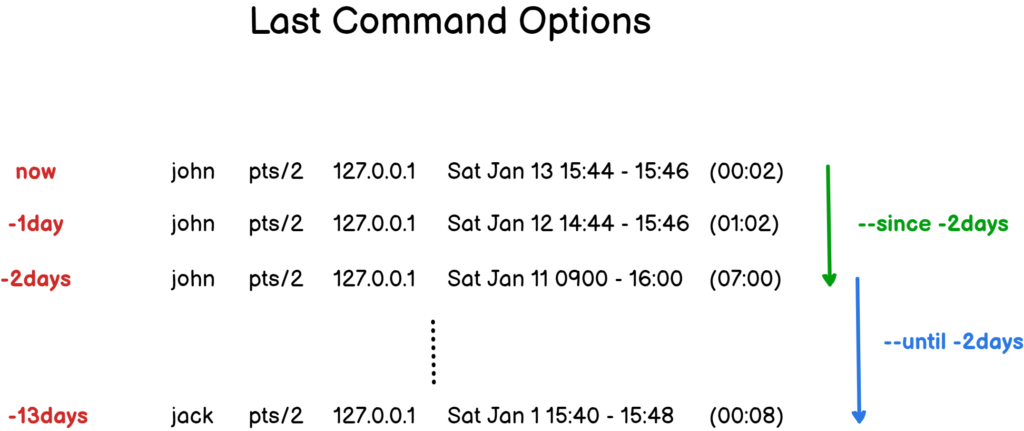
As an example, let’s say that you want to find all login attempts were in the past two days, you would execute the following command
$ last --since -2days
Similarly, if you want to find all login attempts made five days in the past, you would run the following command
$ last --until -5days
As a diagram often helps more than words, here is a way to understand the “–since” and “–until” options.
Find Last Bad Login Attempts using lastb
In order to find the last bad login attempts on your Linux server, you have to use the “lastb” with administrator rights.
$ sudo lastb
If you are not sure about how to check such rights, make sure to read our dedicated guides.
As you can see, the output is quite similar to the one from the “last” command : the username attempted, the device used as well as the time of the attempt.
In this case, the duration “(00:00)” will be fixed as a connection attempt has no duration at all.
Note that the device line can display “ssh:notty” in case that the log in attempt was made from a SSH terminal.
Inspecting the auth.log file
Alternatively, you can inspect the content of the “/var/log/auth.log” file in order to see all failed attempts on your server.
$ tail -f -n 100 /var/log/auth.log | grep -i failed
Find Last SSH Logins on Linux
In order to find the last SSH logins performed on your Linux machine, you can simply inspect the content of the “/var/log/auth.log” and pipe it with “grep” to find SSH logs.
$ tail -f -n 100 /var/log/auth.log | grep -i sshd
Alternatively, you can inspect the logs of the SSH service by running the “journalctl” command followed by the “-u” option for “unit” and the name of the service.
$ sudo journalctl -r -u ssh | grep -i failed
Note : interested in listing services and their statuses on your server? Here is a guide about listing your services on Linux.
If you don’t see any logs related to the SSH service, it might be related to your SSH configuration file, namely to the “PrintLastLog” option.
$ cat /etc/ssh/sshd_config | grep PrintLastLog
If this option is set to “No” on your server and you wish to print last logs, make sure to uncomment the line with the “yes” value. Do not forget to restart your SSH server after that.
$ sudo nano /etc/ssh/sshd_config

PrintLastLog yes

$ sudo systemctl restart ssh

$ sudo systemctl status ssh
Great! You learnt how you can find the last SSH logs on your computer.
List User Last Login on Linux
In order to find last login times for all users on your Linux machine, you can use the “lastlog” command with no options. By default, you will be presented with the list of all users with their last login attempts.
Alternatively, you can use the “-u” option for “user” and specify the user you are looking for.
$ lastlog

$ lastlog -u <user>
As you can see, with no options, the command will return the list of all accounts on your machine, even the root one and system ones.
Conclusion
In this tutorial, you learnt how you can easily find the last login attempts made on a Linux computer.
Whether those attempts were made through a login shell or a SSH session, you now know which files to inspect and which tools to use in order to retrieve them.
Remember that you can inspect those files but you can also plot them on a dashboarding solution such as Kibana, here’s a guide on how to achieve that.
If you are interested in Linux System Administration, we have a complete section dedicated to it on the website, so make sure to have a look!


