Adding new files or a bunch of files to the repositories is quite common for all developers working on the software project with Git. In various cases, we face a situation where we need to add multiple files to git. To make it possible, Git provides a single command for that i.e. git add command also check other Git Commands from this available quick link.
In case, if you want to add untracked files to your repository then also you can simply refer & utilize the same command. Well, this tutorial is designed to explain how easily add all your files to your Git repository. Also, you can learn how to Git Add All New files, modified files, deleted files, untracked files, etc. from the available links.
- Determine your Git version
- Add All Files using Git Add
- The Git Add Command
- Adding all files by Wildcard
- Using dot with git add
- Adding all files on older Git versions
- Adding All deleted and modified files
Determine your Git version
Depending on the current Git version that you installed on your computer, the “git add” command can differ.
To determine your current Git version, use “git” followed by the “–version” option.
$ git --version
Add All Files using Git Add
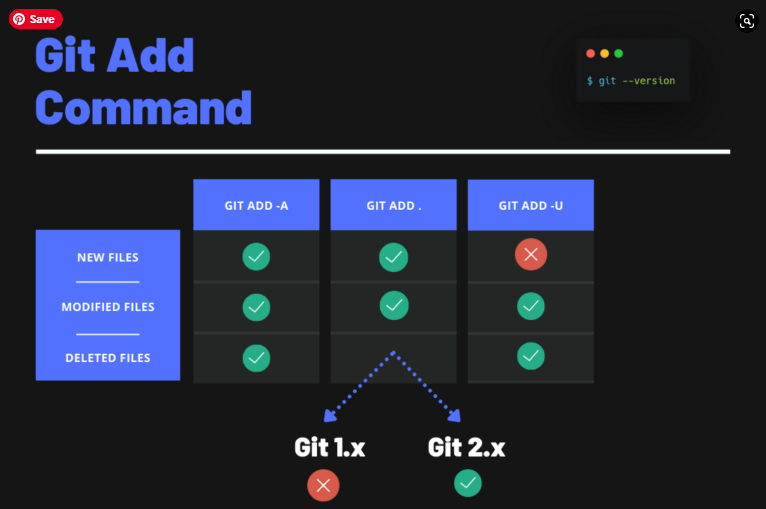
The easiest way to add all files to your Git repository is to use the “git add” command followed by the “-A” option for “all”.
$ git add -A

$ git add .                        (at the root of your project folder)
In this case, the new (or untracked), deleted and modified files will be added to your Git staging area. We also say that they will be staged.
- How To Git Stash Changes | Learn Git Stash Apply, Pop, Clear, Show, Drop
- How to Remove Files from Git Commit | Git Remove File from Commit Stage
- How To Unstage Files on Git | Different Ways to Unstage Files in Git
Alternatively, you can use the “git add” followed by a “.” which stands for “current directory”. However, using the “.” syntax implies that you are currently at the top of your project folder hierarchy.
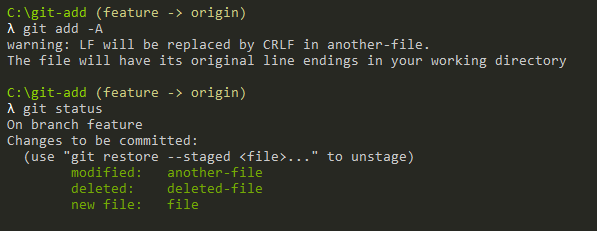
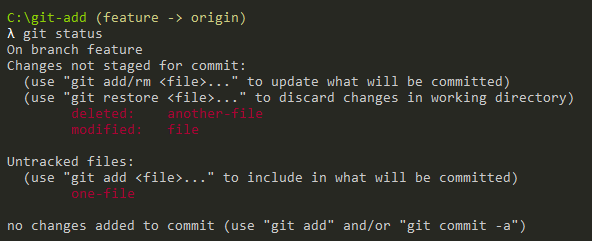
As an example, let’s say that we created a branch named “feature“. On this branch, we have three files: one deleted, one with its content modified, and another one that is untracked.
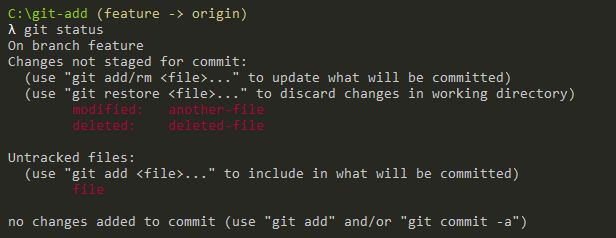
In order to add all those files to our staging area, we will use the “git add” command followed by the “-A” option.
As you can see, the files were correctly added to the staging area, awesome!
You can now commit them to your Git repository in order for the changes to be shared with your colleagues.
The Git Add Command
This command updates the index using the current content found in the working tree, to prepare the content staged for the next commit. It typically adds the current content of existing paths as a whole, but with some options, it can also be used to add content with only part of the changes made to the working tree files applied or remove paths that do not exist in the working tree anymore.
The git add command will not add ignored files by default. If any ignored files were explicitly specified on the command line, git add will fail with a list of ignored files.
The SYNOPSIS of the git add command is as follows:
git add [--verbose | -v] [--dry-run | -n] [--force | -f] [--interactive | -i] [--patch | -p] [--edit | -e] [--[no-]all | --[no-]ignore-removal | [--update | -u]] [--intent-to-add | -N] [--refresh] [--ignore-errors] [--ignore-missing] [--renormalize] [--chmod=(+|-)x] [--pathspec-from-file=<file> [--pathspec-file-nul]] [--] [<pathspec>…]
Adding all files by Wildcard
In some cases, you may be interested in adding all files that have a specific extension : *.txt or *.js for example.
To add all files having a specific extension, you have to use the “git add” command followed by a wildcard and the extension to add.
$ git add *.txt

$ git add *.js
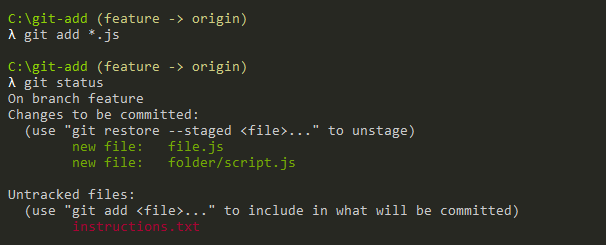
As an example, let’s say that you have created two Javascript files and one text file.
In order to add all Javascript files, we are going to use the wildcard syntax followed by “*.js”.
$ git add *.js
Congratulations, you successfully added your files having a specific extension!
Using dot with git add
As explained before, the “.” symbol stands for “current directory“.
As a consequence, if you don’t use it at the top of your project hierarchy, you will only add files in the current working directory.
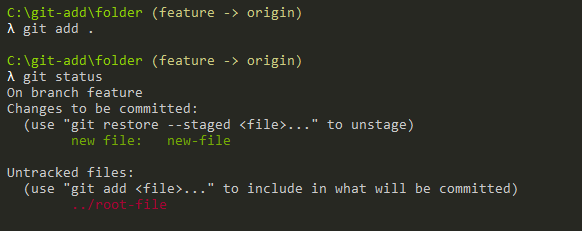
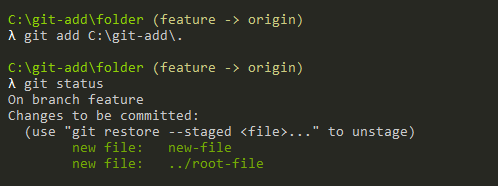
To illustrate this concept, let’s say that you have two new files: “root-file” in your project top folder and “new-file” in a folder named “folder”.
If you navigate to your new folder and execute the “git add” command with the dot syntax, you will notice that you only add files located in this directory.
$ cd folder

$ git add .
As a consequence, you might miss some of your files in your commit.
To avoid this problem, you can use the dot syntax combined with the absolute path to your project top folder.
$ git add <path>/.
Adding all files on older Git versions
In the first chapter, we use the “–version” option in order to check our current Git version.
This step is quite important because the behaviour of the “git add” command can differ depending on the Git version used.
If you use the dot syntax with an old Git version (less than 2.x), the modified and deleted files won’t be automatically added to your commit.
Adding All deleted and modified files
In order to add all deleted and modified files only to your staging area, you have to use the “git add” command followed by the “-u” option.
$ git add -u
As an example, let’s say that we modified one of our files, deleted one, and added one to our working directory.
Using a simple “git status” command, we can inspect the state of our Git working directory.
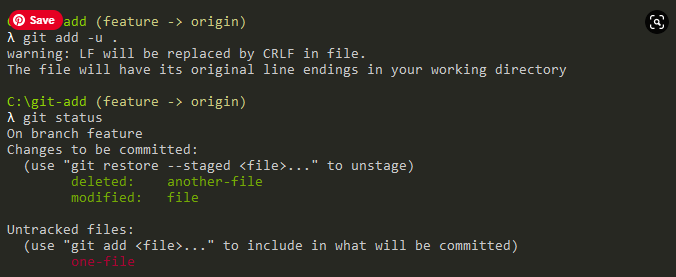
In order to add the deleted and modified files only, we are going to execute “git add” with the “-u” option.
$ git add -u .
Awesome, you successfully added all your deleted and modified files to your current Git repository!
Conclusion
In this tutorial, you learned how you can easily add all your files to your Git repository using the “git add” command. You also learned that you can use specific wildcards or options in order to add only deleted or modified files.
