How To Run a Bash Script

As a system administrator, it is quite likely that you have written some Bash scripts in order to automate your work.

For example, you may want to run Bash scripts in order to backup your work or to log some events happening on your server.

Bash scripts, like scripts written in other programming languages, can be run in a wide variety of ways.

In this tutorial, we are going to focus on all the ways to run a Bash script on Linux.

Prerequisites

Before being able to run your script, you need your script to be executable.

In order to make a script executable on Linux, use the “chmod” command and assign “execute” permissions to the file.

You can either use the binary or the symbolic notation in order to make it executable.

$ chmod u+x script

$ chmod 744 script

If you don’t own the file, you will have to make sure that you belong to the correct group or that permissions are given to the “other” group on your system.

Some distributions will highlight your file in a different color when your file is executable.

Prerequisites script

Now that your file is executable, let’s see how you can run your Bash script easily.

Run Bash Script from script path

In order to run a Bash script on Linux, simply specify the full path to the script and provide arguments that may needed in order to run your Bash script.

$ /path/to/script <arg1> <arg2> ... <argn>

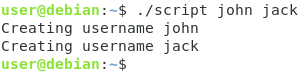
As an example, let’s say that you have a Bash script located in your home directory.

In order to execute this script, you can specify the full path to the script that you want to run.

# Absolute path

$ /home/user/script 

# Absolute path with arguments

$ /home/user/script "john" "jack" "jim"

Alternatively, you can specify the relative path to the Bash script that you want to run.

# Relative path

$ ./script

# Relative path with arguments

$ ./script "john" "jack" "jim"

Awesome, you learnt how you can easily run a Bash script on your system.

Run Bash Script using bash

In order to run a Bash script on your system, you have to use the “bash” command and specify the script name that you want to execute, with optional arguments.

$ bash <script>

Alternatively, you can use “sh” if your distribution has the sh utility installed.

As an example, let’s say that you want to run a Bash script named “script”.

In order to execute it using the “bash” utility, you would run the following command

$ bash script

This is the output from your script!

Execute Bash script using sh, zsh, dash

Depending on your distribution, you may have other shell utilities installed on your system.

“Bash” is the shell interpreter installed by default, but you may want to execute your script using other interpreters.

In order to verify if a shell interpreter is installed on your system, use the “which” command and specify the interpreter you are looking for.

$ which sh

/usr/bin/sh

$ which dash

/usr/bin/dash

Whenever you have identified the shell interpreter that you want to use, simply call it in order to run your script easily.

Run Bash script from anywhere

In some cases, you may want to run Bash scripts wherever you are on your system.

In order to run a Bash script from anywhere on your system, you need to add your script to your PATH environment variable.

$ export PATH="<path_to_script>:$PATH"

Now that the path to the script is added to PATH, you can call it from where you want on your system.

$ script

This is the output from script!

Alternatively, you can modify the PATH environment variable in your .bashrc file and use the “source” command in order to refresh your current Bash environment.

$ sudo nano ~/.bashrc

export PATH="<path_to_script>:$PATH"

Exit the file and source your bashrc file for the changes to be applied.

$ source ~/.bashrc

$ echo $PATH

/home/user/bin:/usr/local/sbin:/usr/local/bin:/usr/sbin:/usr/bin:/sbin:/bin:/usr/games

Great! Now your script can be executed from where you want on your system.

Run Bash Scripts from the graphical interface

The last way to execute Bash scripts is to use the graphical interface, in this case the GNOME interface.

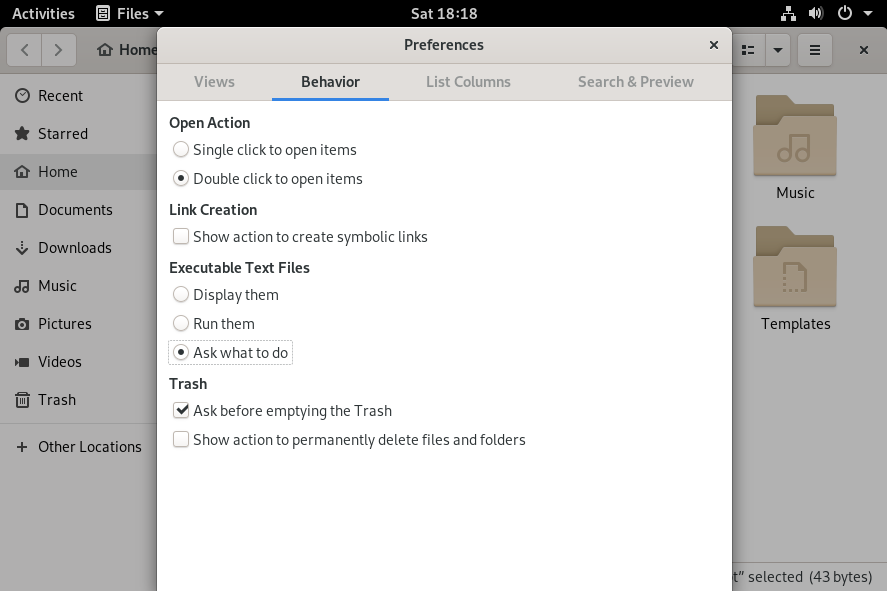
In order to run your scripts using GNOME, you have to set the behaviour of the File Explorer to “Ask what to do” for executable files.

To achieve that, in “Files“, click on the top right line icon and select “Preferences“.

Run Bash Scripts from the graphical interface preferences

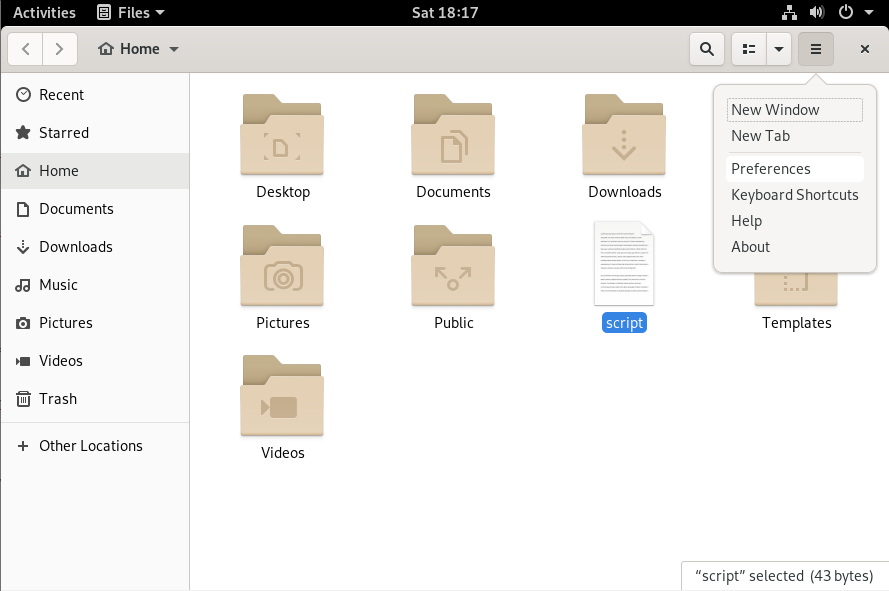
In the menu, click on “Behavior” and select “Ask what to do” under the “Executable Files” section.

Run Bash Scripts from the graphical interface ask-what-to-do

Close this window and double-click on the script file that you want to execute.

When double-clicking, you are prompted with various options : you can either choose to run your script (in a terminal or not) or to simply display the content of the file.

In this case, we are interested in running this script in the terminal, so click on this option.

Run Bash Scripts from the graphical interface run-script

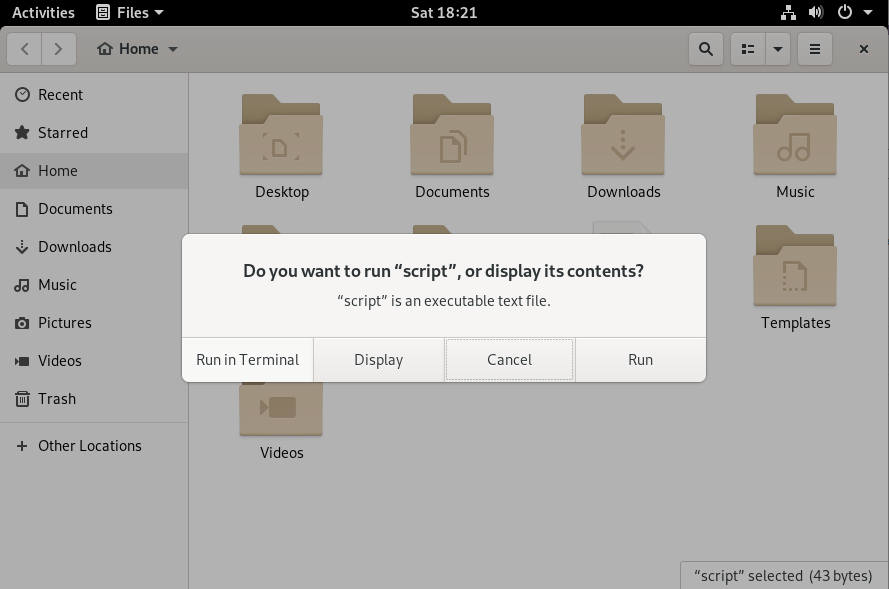
Success! Your script has been successfully executed within a new shell instance.

Conclusion

In this tutorial, you learnt how you can easily run Bash scripts on your system, either by specifying the path to the script or the interpreters available on your host.

You learnt that you can make it even easier by adding your script path to your PATH environment variable or using existing features in the GNOME user interface.

If you are interested in Bash or Linux system administration, we have a complete section dedicated to it on the website, so make sure to check it out!

How To Change IP Address on Linux

As a network administrator, you are probably managing various Linux machines over different subnets of your company infrastructure.

As network topology changes, you may need to change the IP address already implemented on some machines.

Also, if you switched from DHCP to static IP addressing, you will also need to change the IP address on some of your computers.

Luckily for you, Linux has multiple ways of changing your IP address, whether you want it to be dynamic or static.

You will see how it is possible to have multiple IP addresses for a single machine and how you can assign IP addresses to virtual network adapters.

Prerequisites

Before changing your IP address, make sure to have a look at your current IP address.

To find your current IP address, you can use the “ip” command with the “a” option for address.

$ ip a

As you can see from the screenshot, my host is equipped with two network adapters :

  • the loopback address (or localhost) which is used to test the network connectivity of your own computer;
  • the “enp0s3” interface : acting as a main network adapter, the network card has multiple IP addresses associated with it (IPv4 and IPv6) followed by the IP address assigned to them.

In the present situation, my computer can be reached on “192.168.178.31/24” via the “192.168.178.1/24” gateway.

Change IP Address using ifconfig

On modern distributions, the “ifconfig” command has been completely deprecated and it is now advised to use the “ip” command.

However, you should still be able to use the “ifconfig” to change your IP address.

$ which ifconfig

/usr/sbin/ifconfig

To change your IP address on Linux, use the “ifconfig” command followed by the name of your network interface and the new IP address to be changed on your computer.

To assign the subnet mask, you can either add a “netmask” clause followed by the subnet mask or use the CIDR notation directly.

$ ifconfig <interface_name> <ip_address> netmask <netmask_address>
Note : in order to change your IP address, you will need to be an administrator on your computer (part of the sudo group on Debian/Ubuntu or wheel on CentOS/RedHat)

For example, given the IP addresses used in the previous sections, if we want to change our IP address (to 192.168.178.32/24), we would run the following command

$ ifconfig enp0s3 192.168.178.32/24

$ ifconfig enp0s3 192.168.178.32 netmask 255.255.255.0

In order to verify that your IP address was correctly changed, you can run the “ifconfig” command followed by the name of your network adapter.

$ ifconfig <interface_name>

From DHCP to Static

When manually changing your IP address, Linux automatically understands that you want to change from using a DHCP server to static IP addressing.

This information is materialized in the “ifconfig” command : in the first screenshot, you can see that my IP address was assigned with a “dynamic” parameter also called DHCP.

This is not the case anymore after assigning the IP address manually.

Note that your changes are not made permanent by modifying your IP settings with the “ifconfig” : they are only modified for the current session.

Change IP Address Permanently using ifupdown

On Linux, changing your IP address using network utilities does not mean that your IP configuration will be saved on reboots.

Network Files on Debian & Ubuntu

In order to change your IP address on Linux, you will have to add your network configuration in the “/etc/network/interfaces” or create this file if it does not exist already.

# Content of /etc/network/interfaces

iface eth0 inet static
address <ip_address>
netmask <network_mask>
gateway <gateway_ip>

For example, let’s say that you want to change your IP to be “192.168.178.32” with a subnet mask of “255.255.255.0” and a default gateway of “192.168.178.1”.

To change your IP address to reflect those changes, you would edit the content of your interfaces file and add the following content

$ vim /etc/network/interfaces

# Content of /etc/network/interfaces

iface eth0 inet static
address 192.168.178.32
netmask 255.255.255.0
gateway 192.168.178.1

In order for the changes to be applied, you will need to restart your networking service (managed by ifupdown)

# For systemd hosts

$ sudo systemctl restart networking.service

# For pre-systemd hosts

sudo /etc/init.d/networking restart

After restarting your networking service, you should be able to see your new IP by running the “ifconfig” or the “ip” command.

$ ifconfig

$ ip address

Network Files on CentOS & Red Hat

In order to change your IP address on Linux, you will have to add your network configuration in the “/etc/sysconfig/network-scripts” directory.

In the “/etc/sysconfig/network-scripts”, identify the network interface to be modified and start editing it.

$ ls -l /etc/sysconfig/network-scripts

$ nano <file>

Network Files on CentOS & Red Hat network-centos

In order to set an IP to be static on CentOS or RHEL, you want to modify the “BOOTPROTO” parameter from “dhcp” to “static” and add your network information such as the netmask or the default gateway.

On recent distributions such as CentOS 8 or RHEL 8, you have to use the nmcli utility in order for the changes to be effective.

However, if you are still using the network service (for distributions such as CentOS 7 or RHEL 7), you can restart the network service for the changes to be applied.

$ nmcli device reapply <interface_name> (on CentOS 8)

$ systemctl restart network.service (on CentOS 7/RHEL 7)

Awesome!

You successfully changed your IP address on Linux.

Make sure to execute the “ip” command again to verify that your changes were applied.

$ ip a

$ ifconfig

Change IP Address using Network Manager

On modern distributions, equipped with systemd, you may have come across the Network Manager many times.

The Network Manager is an all-in-one tool that exposes multiple utility tools in order to change connections, devices or connectivity settings (even wireless) on your host.

One of those utilities is called “nmcli” and this is what we are going to use in order to change our IP address.

To change your IP address, use “nmcli” on the “device” section and specify that you want to “modify” the “ipv4.address” of your network card.

$ nmcli device modify <interface_name> ipv4.address <ip_address>

Change IP Address using Network Manager nmcli

When using the “nmcli device modify” command, your Network Manager will automatically create a new connection file in the /etc/NetworkManager/system-connections folder.

Change IP Address using Network Manager system-connections

In order for the changes to be effective, you will need to “reapply” parameters to your current connection settings.

$ nmcli device reapply <interface_name>

Congratulations, you successfully changed your IP using the Network Manager!

However, changing settings using the nmcli tool won’t make your changes persistent over multiple reboots.

Change IP Address Permanently using Network Manager

In order for changes to be persistent, you need to edit the connection files located at /etc/NetworkManager/system-connections.

In order to change your IP address, edit the Network Manager configuration file, identify the line to be modified and set the IP address accordingly.

Change IP Address Permanently using Network Manager

Save the file and make sure to reapply the device configuration by using the “nmcli” command with the “device reapply” options.

$ nmcli device reapply

Now that your changes are effective, you can check your IP address by running the “ifconfig” or “ip” commands.

Modify IP Address using Graphical Interface

In some cases, you may want to modify your IPv4 address by navigating through graphical windows.

On modern distributions, the network parameters can be managed by the “network” icon (which is called nm-applet) located at the top right corner of your screen.

Modify IP Address using Graphical Interface nm-applet

In your network settings, click on the “gear wheel” next to the connection to be modified.

Modify IP Address using Graphical Interface nm-applet-2

Next, in the IPv4 section of your connection settings, you can set your IP method to manual and attribute your static IP address.

Modify IP Address using Graphical Interface nm-applet-3

To change your IP address, simply click on “Apply” and restart the networking services by using nmcli.

$ nmcli networking off

$ nmcli networking on

That’s it! You just changed your IP address on Linux.

How networking is managed on Linux

As of January 2020, on recent distributions, you may deal with several tools that are used by your distribution to configure networking.

Most of the time, the Network Manager and ifupdown are managing networking.

$ sudo systemctl status NetworkManager

$ sudo systemctl status networking

In some distributions, “ifupdown” might not be installed at all and interfaces are only managed by the NetworkManager.

However, if the two services exist on your computer, you will be able to declare interfaces in the /etc/network/interfaces file without the NetworkManager interfering with those settings.

How networking is managed on Linux networking

If you want the Network Manager to manage interfaces declared in the interfaces file, you will have to modify the “managed” parameter to true in the NetworkManager.conf configuration file.

How networking is managed on Linux managed

Conclusion

In this tutorial, you learnt how you can successfully change your IP address on Linux : either using the Network Manager or the ifupdown utility.

You also learnt how networking is managed and architectured on Linux and how you should configure it to avoid IP address conflicts.

If you are interested in Linux system administration, we have a complete section dedicated to it on the website, so make sure to check it out!

Single User Mode Secure Boot on Ubuntu & Debian

On Ubuntu and Debian hosts, the single user mode, also referred as the rescue mode, is used to perform critical operations.

The single-user mode can be used to reset the root password or to perform file systems checks and repairs if your system is unable to mount them.

In this tutorial, we are going to see how you can boot on single user mode on Debian and Ubuntu hosts and how to reset the root password.

We are also configure our target units (rescue and emergency) to prompt for a password on single-user mode boot.

Note: in order to boot into rescue or emergency targets, you are need physical access to the machine to interrupt the default GRUB boot process.

Rescue & Emergency Targets on Debian

On recent Debian distributions, systemd is responsible for booting your Linux host using a default target.

If you want to check the default target run by systemd, you can run the following command

$ systemctl get-default

Rescue & Emergency Targets on Debian get-default

As you can see, my system is set to boot on graphical target by default.

As I don’t own any desktop environment like GNOME or KDE, it is going to boot in a simple shell.

However, the graphical target is not the only target available on Linux, you can boot in the following modes:

  • poweroff : used to shutdown your host and power off the system;
  • rescue : a mode used to boot your system with a rescue shell;
  • emergency : similar to the rescue mode except that no services are launched and no filesystems are mounted;
  • multi-user : the default mode on Linux systemd systems, used to boot your host in a non-graphical system (without a desktop environment);
  • graphical : includes the multi-user target and a graphical environment such a KDE or GNOME for example;
  • reboot : shutdowns the system and reboot it immediately

As their names reflect it, those modes are used in order to perform maintenance operations on a Linux system, but they need to be done securely to avoid any security leaks.

In this article, we are going to focus on the rescue and emergency modes and see how we can securely on them.

We are also going to see how booting in single user mode can be used to change the root password or to perform simple filesystems checks.

Configuring the Root Account on Debian

By default, when entering single user mode, you are going to be given a root prompt with complete privileges.

As a consequence, in order to boot in single-user mode (or rescue mode), your root account needs to be unlocked and it needs to have a password.

Checking Root Account Lock Status

On Ubuntu, root accounts are disabled by default as a security measure, and you can choose to have it disabled on Debian 10 also (if you don’t specify a root password when installing Debian)

In order to check if your root account is locked, run the following command

$ sudo -s
$ cat /etc/shadow | grep root

Checking Root Account Lock Status locked-account

As you can see, there is an exclamation mark on the space reserved for the password : it means that the root is locked.

Setting a Root Account Password

In order to set a password for the root account, run the following command

$ sudo passwd

Setting a Root Account Password passwd-root

If you go back to check the content of your shadow file, you should now see that the content has been modified and that no exclamation mark are presented.

Awesome, now we can start booting into single user mode from the GRUB bootloader screen.

Booting in Rescue Mode from GRUB

In order to boot into single user mode, or rescue mode, you are going to interrupt the default boot process when starting your machine.

Reset your machine and interrupt the boot process by pressing a key arrow in the GNU GRUB menu.

If you are running a Debian based distribution, this is what you should see on your screen

Booting in Rescue Mode from GRUB-menu

As described in the bottom description panel, press ‘e’ in order to edit the boot commands

You should now see the following window on your screen

Booting in Rescue Mode from GRUB-2

Using the directional arrows, navigate to the Linux kernel booting line and put the following string at the end of the line.

systemd.unit=rescue.target

You can also simply type “1”, it is equivalent to booting in single user mode on Debian.

Booting in Rescue Mode from GRUB boot-rescue

As described below the boot script, press F10 to boot into rescue target.

Your Linux Kernel will be loaded and your initial virtual filesystem will be loaded.

Before having the access, you will be prompt with the root password that you just changed before.

Booting in Rescue Mode from GRUB rescue-mode

Type the password you defined before, and you should now have a root shell directly into your host.

root-rescue

Awesome! Now that you have a root shell into the host, you can start by changing the root password or by checking your filesystems.

Security Recommendations for Single User Mode

When it comes to the single user mode, or the rescue target, it is important that this mode is password-protected on your system.

As you can see, it is the case by default on Debian 10, but you have to make sure on other distributions that it is the case.

If any intruder has physical access to your machine, in a data-center for example, it could be as easy as rebooting the machine, interrupting the boot process and launching a non-protected single user mode.

From there, every file can be deleted, copied or transferred to a non secure server.

Malicious programs can also be installed to track the host activity and to steal personal information.

Sulogin login shell

Luckily for you, standard Debian distributions are configured to ask for the root password when booting in single user mode.

It can be seen by inspecting the rescue and emergency services on your host (located at /usr/lib/systemd/system)

$ cat /usr/lib/systemd/system/rescue.service

Sulogin login shell rescue-service

By default, when starting, your system is going to launch the systemd-sulogin-shell in rescue mode, which is safe from unauthorized access.

However, you have to make sure that this file was not altered and that the system is not instructed to launch a simple shell (like /bin/sh for example).

This would result in having an unsafe single user mode, essentially having a major security breach if anyone has physical access to the machine.

Conclusion

In this tutorial, you learnt about the single user mode on Debian-based distributions and how it is related to the rescue and emergency targets on Linux.

You learnt that this mode needs to be password protected as it offers a root shell for users who were to log into it.

You also had a look at how you can instruct the GRUB to boot into this mode, and how it can be used to perform maintenance operations on your system.

If you are curious about Linux system administration, we have a complete section dedicated to it on the website.

How To Configure Linux as a Static Router

As a network administrator, you probably know how costly routers can be.

If you are configuring a complex network architecture, you might need Cisco or Netgear routers, as they embed advanced features for network management.

However, if you plan on creating a small network for your company, there might be a cheapier alternative.

What if you could configure a simple Linux server to act as a static router?

Using those features, you could have a Raspberry Pi on your site, that could handle the traffic over two or three different networks.

In this tutorial, we are going to see how you can configure a Linux host to act as a simple static router.

We are also going to review the basics of subnetting in order for you to understand the rules you put in place.

Prerequisites

In order to configure a Linux server as a static router, you need to have sudo privileges on your host.

In order to verify it, you can run the “sudo” command with the “-v” option.

$ sudo -v

If you don’t have sudo rights, you can have a look at our tutorials on becoming sudo on Debian or CentOS distributions.

Now that you have sudo privileges, there are essentially three steps in order to configure your static router :

  • You need to have a global view of your network architecture : what network IP addresses are and which networks will need to communicate with each other;
  • You need to configure the static routing table on your Linux router;
  • You need to enable IP forwarding for packets to flow down your router.

That’s quite a long program, so without further ado, let’s figure out the network architecture and what our network IP addresses are.

Understanding Network Architecture

For the sake of simplicity, we are going to configure a simple static router between two networks.

In order to determine the network IP addresses, let’s pick two hosts in each network : 192.168.200.2/24 and 192.168.190.2/24.

The two hosts don’t belong to the same subnet : as a consequence, they are not able to communicate directly.

Given the netmask of the first host, we are able to determine that the first network has an IP address of 192.168.200.0/24.

Similarly, the second network has an IP address of 192.168.190.0/24.

Using this information, we will be able to configure network interfaces on our Linux router.

Configuring Router Network Interfaces

In order to be able to route packets from one network to another, you need to have two network interfaces : one in the first network and another one in the second network.

In order to keep the tutorial simple, we are going to assume that both hosts are using the router as the default gateway for their respective networks.

This means that the first host is contacting the router on the 192.168.200.1/24 IP address and that second host is contacting the router on the 192.168.190.1/24 IP address.

First of all, you have to identify the network interfaces used for routing

$ ip link show

Private and Public IP Addresses schema

On this host, we have two network interfaces named “enp0s3” and “enp0s8”.

Note : You may have to write down those names as you will have to use them in the next section.

Now that you have your network interfaces names, you will configure your router with a static IP addresses.

Configuring Static IP Address on Debian

If you are running Debian or Ubuntu, head over to the /etc/network/interfaces file and add your two network interface information in it.

$ sudo nano /etc/network/interfaces

# Defining the first interface
auto <interface_name>
iface <interface_name> inet static
address 192.168.190.1
netmask 255.255.255.0

# Defining the second interface
auto <interface_name>
iface <interface_name> inet static
address 192.168.200.1
netmask 255.255.255.0
Note : do not forget to add the “auto” directive, otherwise your interfaces won’t be raised at boot time.

Save your file and restart your networking service in order for the changes to be applied.

$ sudo systemctl restart networking.service

$ sudo systemctl status networking.service

In this case, we are not using the NetworkManager : we are managing interfaces using the ifupdown utility (pretty much like in old distributions).

By now, your interfaces should be up and running, you can check them by running the “ip” command with the “a” option.

Îf your interfaces are not running, or marked as “DOWN”, you can bring them up by running the “ifup” command.

$ ifup <interface_name>

Configuring Static IP Address on CentOS

In order to configure your CentOS host with a static IP address, head over to the “/etc/sysconfig/network-scripts” directory and create two distinct files for your network interfaces.

$ touch ifcfg-enp0s3 && touch ifcfg-enp0s8

To configure a static IP address, you can add the following information in your file.

# Content of enp0s3

BOOTPROTO="static"
IPADDR=192.168.200.1
NETMASK=255.255.255.0
NAME="enp0s3"
ONBOOT="yes"

# Content of enp0s8
BOOTPROTO="static"
IPADDR=192.168.190.1
NETMASK=255.255.255.0
NAME="enp0s8"
ONBOOT="yes"
Note : do not forget to add the “ONBOOT” directives in order for your interfaces to be raised at boot time.

Now that you have your router connected to both networks, you will need to add a static route between your two networks in order for them to communicate.

Creating Static Routes using ip

Having two network interfaces does not mean that your kernel will naturally route packets from one interface to another.

First of all, make sure to list the existing routes that may exist on your server by running the “ip route” command.

$ ip route

Creating Static Routes using ip-route

Deleting existing static routes

If static routers are already defined for your network interfaces, you will need to delete them : otherwise, you won’t be able to add new ones.

To delete a route, use the “ip route” command with the “delete” option and specify the route to be deleted.

$ ip route delete <route>

In our case, we want to delete routes that are pointing to the 192.168.190.0/24 and 192.168.200.0/24 networks.

$ ip route delete 192.168.190.0/24

$ ip route delete 192.168.200.0/24

$ ip route

Deleting existing static routes ip-route-2

Now that routes are deleted, you can add the ones you are interested in.

Creating new static routes

In order for the packets to flow from the first network to the second, your first network card need to point to the second one and vice-versa.

First, you can create a route from the first network adapter IP address to the second network IP address.

$ ip route add 192.168.200.0/24 via 192.168.190.1

Using this rule, all packets coming using the 192.168.190.1 interface as their gateway can be redirected to the 192.168.200.0 network.

Similarly, you can add another route in the opposite direction in order for your packets to be able to flow back.

$ ip route add 192.168.190.0/24 via 192.168.200.1

Now that your routes are added, you can verify that they are up and active by running the “ip route” command again.

$ ip route

Creating new static routes ip-route-3

Now that your routes are added, there is one last step that you need to configure in order for your hosts to be able to ping each other.

Enabling IP forwarding on Linux

Even if routes exist, the Kernel will not naturally forward packets to corresponding network interfaces without configuration.

In order to enable IP forwarding, head over to the /etc/sysctl.conf file and look for the “net.ipv4.ip_forward” parameter.

$ vi /etc/sysctl.conf

By default, this parameter is set to “0”, but you want to set it to “1” in order to enable IP forwarding.

Enabling IP forwarding on Linux ip-forwarding
Save your file and refresh the system configuration by running the “sysctl” command.

$ sysctl -p /etc/sysctl.conf

Enabling IP forwarding on Linux sysctl

Testing network connectivity

Now that IP forwarding is enabled, you should be able to ping from a host on the first network to a host on the second network.

In order to check it, connect to a host on the first network and run a “ping” command on a host located on the second network.

$ ping <host_second_network>

In our case, we would want to ping the “192.168.190.2/24” host from the “192.168.200.2/24” one.

Testing network connectivity ping-network

Awesome! Your first host is able to ping the second one.

As an additional check, you could make sure that your second host is able to ping the first one.

Great!

Now that your setup is ready, you should be able to add new hosts to both networks and start communicating between the two networks.

Conclusion

In this tutorial, you learnt how you can easily configure a Linux system as a static router.

This setup can be quite useful if you plan on building a small network infrastructure for your company.

Instead of buying and having to configure a Cisco router, you can simply use a Raspberry Pi as a static router.

If your company grows and you plan on having a bigger network infrastructure, then you can check managed routers as they will probably offer more flexibility to your needs.

If you are interested in Linux System Administration, we have a complete section dedicated to it on the website, so make sure to check it out!

How To Get Your IP Address on Linux

When working on Linux operating systems, knowing how to get your IP address is essential.

Getting your IP address is often the first step of most network troubleshooting processes.

If you are trying to reach a website but the website is no answering back, it might be because your network adapter is badly configured.

Similarly, you might want to reach internal addresses, but if your IP address is configured in the wrong subnet, you won’t be able to ping them.

In this tutorial, we are going to see how you can get your IP address on Linux easily.

We are also going to explain the difference between private IP addresses and public IP addresses.

Find your private IP on Linux

The easiest way to get your private IP address on Linux is to use the “ip” command with the “a” option for “address”.

$ ip a

$ ip address

When running the “ip” command, you will be presented with all the network interfaces available on your host.

In this case, the server has two network interfaces : the loopback address (or localhost) and the “enp0s3” interface.

For this network interface, you are presented with multiple information :

  • Network adapter general information : its state (up or down), its MTU as well as the qlen for the Etherner buffer queue;
  • Layer 2 information : in this case, you are running on the Ethernet protocol with a given MAC address and a broadcast address;
  • Layer 3 information : what you are probably interested in which is your IPv4 address in CIDR notation, the subnet broadcast address as well as the address lifetime (valid_lft and preferred_lft)
  • IPv6 addresses : this section might not appear in your network adapter configuration as not all interfaces are running IPv6 addresses. If this is the case, it will appear here.

Find IP Address using hostname

The “hostname” command is quite popular on Linux operating systems and it is used in order to get and set the hostname of a server.

In order to find your private IP address, use the “hostname” command with the “-I” option for IP address. Note that multiple IP addresses will be shown if you own IPv4 and IPv6 addresses on the same interface.

$ hostname -I

As you can see, in this case, my network adapter owns two different IP addresses :

  • 192.168.178.30 : which is a private IP address of the local subnet (192.168.178.0)

However, in this case, you are presented with the subnet mask which is not very handy if you are looking to allocate an IP to a new host on this subnet.

Find Subnet Mask using ifconfig

In order to use the ifconfig command, you need to have the “net-tools” package installed on your host.

In order to install the “net-tools”, simply run the “apt-get install” command with the “net-tools” package. You will need to have sudo rights to install packages on your system.

$ sudo apt-get install net-tools

In order to find the subnet mask for your host, use the “ifconfig” command with the interface name and pipe it with the “grep” command to isolate the “mask” string.

$ sudo ifconfig | grep -i mask

Find Subnet Mask using ifconfig mask

In this case, you are presented with subnet masks for every network interface (loopback interface included).

Note that you are also provided with the broadcast address if applicable.

Get your private IP address on Desktop

In some cases, you might find handy to find your private IP address by navigating the menus provided by your desktop environment.

  • To get your private IP address, open the “Settings” utility by browsing the “Activities” menu at the top left corner of your screen.

Get your private IP address on Desktop settings

  • Now that the “Settings” are open, find the “Network” section and click on the cog-wheel located at the right of your default network adapter.

Get your private IP address on Desktop network

  • In the settings of your default network adapter, you will be provided with your different IP addresses, as well as your hardware address (or MAC address) and your default DNS address.

Awesome, you have successfully found your private IP address using the desktop environment (in this case, GNOME)

Find Default Gateway IP Address

In some cases, you are not interested in your own IP address but in the IP address of the gateway.

In order to find the IP address of your default gateway, use the “ip” command with the “r” option for “route”. You can use the “grep” command in order to isolate the “default” string which is the default gateway.

$ ip r | grep default

$ ip route | grep default

Find Default Gateway IP Address ip-route

In this case, you are interested in the line with a “default” option which is the route taken for packets sent over the network by default.

Private and Public IP Addresses

In the previous sections, we have seen how you can easily have your IP address using several commands.

However, those commands were used to determine your private IP address, not your public one.

So what’s the difference between your private IP address and your public IP address?

In short, the private IP address is used on your specific private subnet, most of the time at home on a LAN network.

When you are trying to reach websites outside of your home network, you are using a public IP address that is assigned by your Internet Service Provider (or ISP).

As a consequence, you are not able to directly get your public IP address because it will be assigned to the network adapter of your default gateway (which is a router at home).

Private and Public IP Addresses schema

To get your public IP address, you will need to ask an external service unless you are able to connect to your router directly.

Find Public IP Address on Linux

The first method to find your public IP address on Linux is to use a external HTTP services.

Those HTTP services are programmed to send back the IP that made the request in the first place, which is your default public IP address.

In order to get your public IP address on Linux, use the “curl” command and add one of the following websites as a parameter :

  • ifconfig.io
  • ifconfig.co
$ curl http://ifconfig.io

222.265.124.60

Awesome, you have successfully identified your public IP address using a external third-party service.

Find Public IP Address using dig

The other way to get your public IP address on Linux is to use the “dig” utility.

The “dig” utility might not come directly with your distribution. If you do not own “dig”, you can install it by installing the “dnsutils” package on your machine.

$ sudo apt-get install dnsutils
Note : you need to have sudo privileges in order to install new packages on your machine.

Now that “dig” is correctly installed, you can perform a DNS query in order to get your public IP address.

To get your public IP address, use the “dig” command and specify specific DNS servers that are programmed in order to answer your own IP address back (in this case, Google DNS servers)

$ dig TXT +short o-o.myaddr.l.google.com @ns1.google.com

"222.265.124.60"

Great, you have successfully identified your public IP address on Linux!

Conclusion

In this article, you learnt how you can easily get your private IP address using command-line utilities already installed on your computer.

You have learnt about the difference between private IP addresses and public IP addresses and you have used external third-party utilities in order to identify your public IP address.

If you are interested in Linux System Administration, we have a complete section dedicated to this subject, so make sure to check it out!

How To Copy Directory on Linux

Copying directories on Linux is a big part of every system administrator routine.

If you have been working with Linux for quite some time, you know how important it is to keep your folders well structured.

In some cases, you may need to copy some directories on your system in order revamp your main filesystem structure.

In this tutorial, we are going to see how you can easily copy directories and folders on Linux using the cp command.

Copy Directories on Linux

In order to copy a directory on Linux, you have to execute the “cp” command with the “-R” option for recursive and specify the source and destination directories to be copied.

$ cp -R <source_folder> <destination_folder>

As an example, let’s say that you want to copy the “/etc” directory into a backup folder named “/etc_backup”.

The “/etc_backup” folder is also located at the root of your filesystem.

In order to copy the “/etc” directory to this backup folder, you would run the following command

$ cp -R /etc /etc_backup

By executing this command, the “/etc” folder will be copied in the “/etc_backup”, resulting in the following folder.

Copy Directories on Linux copy-directory

Awesome, you successfully copied one folder in another folder on Linux.

But, what if you wanted to copy the content of the directory, recursively, using the cp command?

Copy Directory Content Recursively on Linux

In order to copy the content of a directory recursively, you have to use the “cp” command with the “-R” option and specify the source directory followed by a wildcard character.

$ cp -R <source_folder>/* <destination_folder>

Given our previous example, let’s say that we want to copy the content of the “/etc” directory in the “/etc_backup” folder.

In order to achieve that, we would write the following command

$ cp -R /etc/* /etc_backup

When listing the content of the backup folder, you will come to realize that the folder itself was not copied but the content of it was.

$ ls -l /etc_backup

Copy Directory Content Recursively on Linux copy-content-directory

Awesome, you copied the content of the “/etc” directory right into a backup folder!

Copy multiple directories with cp

In order to copy multiple directories on Linux, you have to use the “cp” command and list the different directories to be copied as well as the destination folder.

$ cp -R <source_folder_1> <source_folder_2> ... <source_folder_n>  <destination_folder>

As an example, let’s say that we want to copy the “/etc” directory as well as all homes directories located in the “/home” directory.

In order to achieve that, we would run the following command

$ cp -R /etc/* /home/* /backup_folder

Copy multiple directories with cp copy-multiple

Congratulations, you successfully copied multiple directories using the cp command on Linux!

Copy Directories To Remote Hosts

In some cases, you may want to copy a directory in order to keep a backup on a backup server.

Needless to say that your backup server is locally remotely : you have to copy your directory over the network.

Copying using rsync

In order to copy directories to remote locations, you have to use the rsync command, specify the source folder as well as the remote destination to be copied to.

Make sure to include the “-r” option for “recursive” and the “-a” option for “all” (otherwise non-regular files will be skipped)

$ rsync -ar <source_folder> <destination_user>@<destination_host>:<path>

Also, if the “rsync” utility is not installed on your server, make sure to install it using sudo privileges.

$ sudo apt-get install rsync

$ sudo yum install rsync

As an example, let’s say that we need to copy the “/etc” folder to a backup server located at 192.168.178.35/24.

We want to copy the directory to the “/etc_backup” of the remote server, with the “devconnected” username.

In order to achieve that, we would run the following command

$ rsync -ar /etc devconnected@192.168.178.35:/etc_backup

Copying using rsync-distant

Note : we already wrote a guide on transferring files and folders over the network, if you need an extensive guide about it.

Similarly, you can choose to copy the content of the “/etc/ directory rather than the directory itself by appending a wildcard character after the directory to be copied.

$ rsync -ar /etc/* devconnected@192.168.178.35:/etc_backup/

Finally, if you want to introduce the current date while performing a directory backup, you can utilize Bash parameter substitution.

$ rsync -ar /etc/* devconnected@192.168.178.35:/etc_backup/etc_$(date "+%F")

Copying using rsync backup-1

Note : if you are looking for a tutorial on setting dates on Linux, we have a guide about it on the website.

Copying using scp

In order to copy directory on Linux to remote location, you can execute the “scp” command with the “-r” option for recursive followed by the directory to be copied and the destination folder.

$ scp -r <source_folder> <destination_user>@<destination_host>:<path>

As an example, let’s say that we want to copy the “/etc” directory to a backup server located at 192.168.178.35 in the “/etc_backup” folder.

In order to achieve that, you would run the following command

$ scp -r /etc devconnected@192.168.178.35:/etc_backup/

Copying using scp

Congratulations, you successfully copied an entire directory using the scp command.

Very similarly to the rsync command, you can choose to use Bash parameter substitution to copy your directory to a custom directory on your server.

$ scp -r /etc devconnected@192.168.178.35:/etc_backup/etc_$(date "+%F")

Conclusion

In this tutorial, you learnt how you can easily copy directories on Linux, whether you choose to do it locally or remotely.

Most of the time, copying directories is done in order to have backups of critical folders on your system : namely /etc, /home or Linux logs.

If you are interested in Linux System Administration, we have a complete section dedicated to it on the website, so make sure to check it out!

How To Count Files in Directory on Linux

As a system administrator, you are probably monitoring the disk space on your system all the time.

When browsing directories on your server, you might have come across directories with a lot of files in them.

Sometimes, you may want to know how many files are sitting in a given directory, or in many different directories.

In other words, you want to count the number of files that are stored in a directory on your system.

In this tutorial, we are going to see how you can easily count files in a directory on Linux.

Count Files using wc

The easiest way to count files in a directory on Linux is to use the “ls” command and pipe it with the “wc -l” command.

$ ls | wc -l

The “wc” command is used on Linux in order to print the bytes, characters or newlines count. However, in this case, we are using this command to count the number of files in a directory.

As an example, let’s say that you want to count the number of files present in the “/etc” directory.

In order to achieve that, you would run the “ls” command on the “/etc” directory and pipe it with the “wc” command.

$ ls /etc | wc -l

268

Count Files using wc-count

Congratulations, you successfully counted files in a directory on Linux!

Remark using wc command

An important command when using the “wc” command resides in the fact that it comes the number of newlines for a given command.

As a consequence, there is a big difference between those two commands

$ ls -l | wc -l

269

$ ls | wc -l

268

Even if we think that those two commands would give us the same output, it is not actually true.

When running “ls” with the “-l” option, you are also printing a line for the total disk allocation for all files in this directory.

Remark using wc command ls

As a consequence, you are counting a line that should not be counted, incrementing the final result by one.

count-files

Count Files Recursively using find

In order to count files recursively on Linux, you have to use the “find” command and pipe it with the “wc” command in order to count the number of files.

$ find <directory> -type f | wc -l

As a reminder, the “find” command is used in order to search for files on your system.

When used with the “-f” option, you are targeting ony files.

By default, the “find” command does not stop at the first depth of the directory : it will explore every single subdirectory, making the file searching recursive.

For example, if you want to recursively count files in the “/etc” directory, you would write the following query :

$ find /etc -type f | wc -l

2074

When recursively counting files in a directory, you might not be authorized to explore every single subentry, thus having permission denied errors in your console.

Count Files Recursively using find permission-denied

In order for the error messages to be redirected, you can use “output redirection” and have messages redirected to “/dev/null”.

$ find /etc -type f 2> /dev/null | wc -l

2074

Awesome, you recursively counted files in a directory on Linux!

Count Files using tree

An easy way of counting files and directories in a directory is to use the “tree” command and to specify the name of the directory to be inspected.

$ tree <directory>

3 directories, 3 files

Count Files using tree-command

As you can see, the number of files and directories is available at the bottom of the tree command.

The “tree” command is not installed on all hosts by default.

If you are having a “tree : command not found” or “tree : no such file or directory”, you will have to install it using sudo privileges on your system.

$ sudo apt-get install tree             (for Ubunbu/Debian hosts)

$ sudo yum install tree                 (for CentOS/RHEL hosts)

Counting hidden files with tree

In some cases, you may want to count hidden files on your system.

By default, whether you are using the “tree”, “find” or “ls” commands, hidden files won’t be printed in the terminal output.

In order to count hidden files using tree, you have to execute “tree” and append the “-a” option for “all”, followed by the directory to be analyzed.

$ tree -a <directory>

For example, if we count files and directories in your “/home” directory, you will be able to see that there is a difference because multiple hidden files are present.

$ tree /home/user

4321 directories, 27047 files

$ tree -a /home/user

9388 directories, 32633 files

Counting Files using Graphical User Interface

If you are using a Desktop interface like KDE or GNOME, you might have an easier time counting files in directories.

KDE Dolphin File Manager

A quick way of finding the number of files in a directory is to use the Dolphin File Manager.

Click on the bottom left corner of your user interface and click on the “Dolphin File Manager” entry.

KDE Dolphin File Manager dolphin-file-manager

When you are in the Dolphin File Manager, navigate to the folder that you want to explore.

Right-click on the folder and select the “Properties” option.

KDE Dolphin File Manager dolphin-2

The “Properties” window will open and you will be able to see the number of files and subdirectories located in the directory selected.

KDE Dolphin File Manager number-files-kde

Awesome, you counted the number of files in a directory on KDE!

GNOME Files Manager

If you are using GNOME as a Desktop environment, navigate to the “Activities” menu on the top-left corner of your Desktop, and search for “Files”.

GNOME Files Manager Files-GNOME

When in the “File Explorer”, select the folder to be inspected, right-click on it and select the “Properties” option.

GNOME Files Manager properties

When in the “Properties” window, you will be presented with the number of “items” available in the folder selected.

Unfortunately, you won’t be presented with the actual number of “files”, but rather the number of “items” which can be found to be quite imprecise.

GNOME Files Manager etc

Awesome, you found the number of items available in a directory on Linux!

Conclusion

In this tutorial, you learnt how you can easily count files in a directory on Linux.

You have seen that you can do it using native commands such as the “wc” and “find” commands, but you can also install utilities in order to do it quicker.

Finally, you have seen how you can do it using user interfaces such as GNOME or KDE.

If you are interested in Linux System Administration, we have a complete section dedicated to it on the website, so make sure to check it out!

Network File System (NFS) Administration on Linux

Network File Systems, also shortened NFS, are file systems that can be accessed over the network.

Compared to filesystems that may be local to your machine, network file systems are stored on distant machines that are accessed via a specific network protocol : the NFS protocol.

NFS belongs to the large family of file sharing protocols, among with SMB, FTP, HTTP and many other file sharing protocols.

NFS has its own way of accessing and securing distant filesystems, as well as different ways of securing access to remote filesystems.

In this tutorial, we are going to setup a NFS server on a remote machine and install a NFS client in order to access it.

We are going to configure the NFS server depending on the resource that we want to share, and we are going to see the little gotchas that there is to know about NFS.

What You Will Learn

If you follow this tutorial until the end, you are going to learn about the following concepts :

  • How you can setup a NFSv4 server, create a shared folder and export it to remote clients;
  • How to install a NFS client and how to bind it to your NFS server;
  • How user authentication works on NFS and why NFS authentications is considered weak;
  • What is squashing and why you should always enable root_squashing;
  • How NFS handles concurrent editing compared to other file sharing protocols.

That’s quite a long program, so without further ado, let’s start by seeing on you can setup your own NFSv4 server.

Setting up a NFSv4 Server

For this tutorial, we are going to use a standard Kubuntu distribution, but the rest of this tutorial should work the same if you are using another distribution.

$ uname -a

Linux kubuntu 5.3.0-18-generic #19-Ubuntu GNU/Linux

Before installing any packages, make sure that your system is properly configured with the apt command.

sudo apt-get update

Now that your system is updated, you will have to install several packages for your NFS server.

Installing NFSv4 Server

In order to install a NFS server on Linux, you have to install the “nfs-kernel-server” with apt.

$ sudo apt-get install nfs-kernel-server

Installing NFSv4 Server nfs-server

As you can see from the screenshot above, the nfs-kernel-server comes with some configuration files that you will need to tweak :

  • exports : used as a configuration file to set the directories to be exported through NFS;
  • nfs-kernel-server : that can be used if you want to setup authentication or modify RPC-related parameters of your NFS server.

For this tutorial, we are only configure to modify the exports file in order to export our directories.

Exporting directories with exports

As stated above, we are going to modify the exports file located in the etc directory in order to share directories.

Exporting directories with exports

The syntax for the exports file is pretty straightforward.

The exports file is a column-separated file made of the following fields :

  • Local directory : the directory to be exported on the local filesystem;
  • IP or hostname of the machine that you want to grant access to;
  • NFS options such as rw (for read-write), sync (meaning that changes done are directly flushed to disk)

First, you need to create a directory that will be exported on your system. You obviously don’t have to create it if the directory already exists on your machine.

$ sudo mkdir -p /var/share

For now, you can let root as the owner and as the group owning the file, but we will modify it later on depending on the permissions we want for this shared folder.

Exporting directories with exports share-folder

Now that your shared folder is created, you will need to add it to the exports file in order to be exported.

Head back to your /etc/exports file and add the information we specified in the bullet-list above.

Exporting directories with exports exporting

In the first column, you need to specify the folder to be exported which is the share folder we just created.

Next, you have to specify the IP or hostnames that can mount this directory locally.

In this case, we chose to have a network IP set in the exports file, but it might be different for you.

In order to export all directories specified in the “exports” file, you need to use the “exportfs” command with the “-a” option for “all”.

$ sudo exportfs -a

Next, you can verify that your folders were correctly exported by running the “exportfs” command with the “-v” option for “verbose”.

$ sudo exportfs -v

Exporting directories with exports exported

As you probably noticed, some options that were not specified in the exports file were set by the NFS server by default :

  • rw : read and write operations are authorized on the volume (this option was originally specified in the file);
  • wdelay : the NFS server will induce a small write delay if it suspects that multiple write operations are currently performed at the same time;
  • root_squash : the “root” account will be “squashed” to the anonymous user by default. If you don’t what squashing is, you can read about it in the next sections;
  • no_subtree_check : by default, the NFS server will check that the operation requested is part of the filesystem exported on the server;
  • sec=sys : by default, NFS will use the credentials set on the server. If your system uses local authentication, those credentials will be used, but if NIS is used, it will be used as the authentication system;
  • secure : this option verifies that requests originate from a port lower than 1024 (as a reminder, NFS client requests originate from port 111);
  • no_all_squash : except for the “root” account, other users are not squashed when interacting with the NFS server.

Customize Firewall Rules for NFS

In order for our clients to connect to our NFS server, you will need to make sure that the firewall is configured to accept NFS connections.

As a quick reminder, NFS runs on port 2049 on the server.

For Debian and Ubuntu, you are probably running an UFW firewall (you can verify it with the “ufw status” command)

To allow NFS connections to your server, run the”ufw” command as root and allow connections on port 2049.

$ sudo ufw allow 2049

Customize Firewall Rules for NFS ufw-status

On the other hand, if you are running a Red Hat or a CentOS distribution, you will have to tweak the “firewalld” built-in firewall.

$ sudo firewall-cmd --add-port=2049/tcp

Customize Firewall Rules for NFS firewalld

Finally, make sure that your network adapter is correctly exposing the 2049 port to the outside world with the “netstat” command.

$ netstat -tulpn | grep 2049

Customize Firewall Rules for NFS netstat

Okay, now that you have made sure that your NFS server is correctly up and running and that your shares are exported, let’s see how you can configure your NFS clients.

Configuring NFSv4 Clients

Configuration on the client is pretty straight-forward, but you are going to need specific packages to mount NFS partitions.

Mounting NFS partitions on clients

First, you need to install the “nfs-utils” package in order to be able to mount NFS packages.

You obviously need to have sudo privileges in order to install new packages. Here are some tutorials for Debian/Ubuntu and CentOS/RHEL.

$ sudo apt-get install nfs-utils

$ sudo yum install nfs-utils

Now that the package is installed, you can simply mount the partition using the following syntax

$ mount -t nfs <dest_ip_or_hostname>:<remote_path> <mount_point>

For example, let’s say that your NFS server is located on the 192.168.178.31/24 IP address and that you want to share the /var/share folder on the server.

To export this folder, you would write the following command

$ sudo mount -t nfs 192.168.178.31:/var/share /var/share

The NFS client troubleshooting is not very practical, however it your terminal hands, it probably means that you cannot reach the destination host.

If the command executes successfully, you should be able to list your new mount point using the df command.

$ df -H

Mounting NFS partitions on clients df

Creating new files on the NFS volume

As you probably remember from the last section, we have seen that our NFS volume is configured to squash the root account by default but no other users.

Furthermore, the shared folder is owned by root and by the root group.

Creating new files on the NFS volume owning

If you try to create new files on this volume, you will get a permission denied error, even when trying to create them with sudo.

Creating new files on the NFS volume permission-denied

Why?

The client account does not belong to the “root” group on the server, and if you try to create a file as root on the client, you will be squashed to the anonymous account.

A Word on NFS User Management

Before configuring our server and client in order to share folders properly, let’s have a quick review on how user management works on NFS volumes.

As you probably learnt in our previous tutorials, a user is identified by a user ID (also called UID) and this UID is unique on a machine but it won’t be unique on multiple machines of a same site.

A Word on NFS User Management user-management

However, if your system is not configured to work with a central user management system (such as NIS, OpenLDAP, or Samba), your user IDs might conflict on the systems that you are operating on.

In this case, if we consider that you are not having a central management system, we will simply state that you are keeping consistent user list among systems.

A Word on NFS User Management user-management-2

Now that user and groups are made consistent among hosts, let’s create a group that will be able to add and delete files to the folder.

Creating a group for NFS sharing

In this tutorial, we are going to assume that “administrators” are able to add and delete files on this folder.

First, on the server, use the “groupadd” command in order to create this new group

$ sudo groupadd administrators

You can then change the group owning your NFS share to be “administrators

$ sudo chown :administrators /var/share

On the server, add the permitted users to the group you just created.

$ sudo usermod -aG administrators <user>

You don’t have to re-export your shared drives, you can simply start creating files now that permissions are properly configured.

On the client, let’s create a new file in the shared drive using the touch command.

$ cd /var/share && touch file-example

On the server, you will be able to see that your file was correctly created.

Creating a group for NFS sharing file-success

Awesome!

You successfully created a NFS volume and you shared it with client machines.

Persistent NFS mounts with fstab

As you already know from previous tutorials, mounting a drive on Linux using the mount command does not make it persistent over reboots.

In order to make your mounts persistent, you need to add them to the fstab file.

As a privileged user, edit the fstab file and add a line for your NFS drive

#
# /etc/fstab
# Accessible filesystems, by reference, are maintained under '/dev/disk'.

<ip_address>:<remote_path>   <mountpoint>  nfs  <options>  0   0

For example, given the NFS volume created before on “192.168.178.31” on the “/var/share” path, this would give

#
# /etc/fstab
# Accessible filesystems, by reference, are maintained under '/dev/disk'.

192.168.178.31:/var/share  /var/share  nfs  defaults  0   0

If you are using a systemd based system, you can reload dependent daemons by running the daemon-reload command

$ systemctl daemon-reload

Awesome!

You can now reboot your client machine and verify that your drive was correctly mounted at boot.

Persistent NFS mounts with fstab df-h

Going Further with NFS

In this section, we are going to discuss advanced topics about NFS, specifically how concurrent editing is handled and how you can tweak your NFS configurations to specific client hosts.

Concurrent Editing

When using NFS, you will probably end up editing some files along with multiple other users.

Natively, the NFS server won’t prevent you from editing the same file.

If you are using vi as a text editor, you will be notified that some modifications are already performed by another user (via a swp file).

Concurrent Editing being-edited

However, NFS file swaps won’t prevent you from editing the file : it will just display a warning message on the files currently being edited.

Moreover, if you are using other text editors, no “swp” files will be created and the file will have the content of the last modification performed.

Note that there is a way to lock files locally using the local_lock” parameter on the client-side, you can check the Linux documentation if you are interested in this option.

Concurrent Editing local-lock

Exporting folders to specific client IP addresses

In some cases, you may need to export a folder to specific clients on your subnet.

In order to determine the IP address of your client, head over to the client machine and use the “ip” command with the “a” option for address.

$ ip a

As you can see, my client host has two interfaces : the loopback interface (or localhost) and one network adapter named “enp0s3”.

The latter has an IP address already assigned to the interface which can be seen on the “inet” line : 192.168.178.27/24.

If you want to export your folders to an entire subnet, you can specific the subnet IP : as a consequence, every IP on the subnet will be able to export your folder.

Exporting folders to specific client IP addresses nfs-arch

Similarly, it is possible to check the hostname of the client machine in order to export it later on the server.

$ hostname

Exporting folders to specific client IP addresses hostname

Back to the exports file, you can choose to have one or multiple IP addresses exported or to export a machine by its hostname.

Exporting folders to specific client IP addresses specific-ip

NFS monitoring

When installing the nfs-common package, you will also end up installing the “nfsstat” utility which is a program that exposes NFS statistics.

Using nfsstat, you will be able to see the total number of operations done on your NFS server as well as the current activity.

NFS monitoring nfsstat

Conclusion

In this tutorial, you learnt how you can setup a NFSv4 server easily using the nfs-kernel-server utility.

You also learnt how you can mount the drives on the clients and about the different options that you have to tweak your NFS mounts.

Finally, you went in-depth about NFS drives and learnt how user management is done among multiple host machines and how you should setup your own user management system.

If you are interested in Linux System administration, we have a complete section dedicated to it on the website, so make sure to check it out!

Advanced Bash Scripting Guide

In our previous tutorial on Bash, we have seen how you can effectively createrun and write simple conditional statements in Bash.

You have discovered many concepts of Bash such as exit statuses and how they can indicate a script success or a script failure.

Moreover, you have discovered shell built-ins (such as type or source) and how they differ from Bash variables.

Finally, you have learnt how you can declare and assign values to Bash values easily.

In this tutorial, we are taking a sneak peek at advanced features of the Bash shell scripting.

You will have a greater understanding of for loops, while loops and case statements.

We will also have a close look at Bash special variables as well as declaring options for your Bash scripts using the getopts shell built-in.

What You Will Learn

If you follow this tutorial until the end, you will have a deeper understanding of the following Bash concepts :

  • What are positional parameters and how they can be used;
  • What Shell special parameters are and what are the most common Shell special parameters that you can use;
  • How to declare and use for loops in order to iterate over an argument list;
  • How to declare and use while loops and how to write proper termination conditions;
  • How you can use “case” statements in order to specify special actions for given arguments;
  • What Shell options are and how they can be captured using getopts;
  • How to declare and execute simple Bash functions

That’s quite a long program so without further ado, let’s jump right into it.

Bash Positional Arguments

In Bash, you can provide “arguments” to the script you are writing.

“Arguments” are values passed to your script that can be interpreted inside your script as variables.

They can be used in order to provide additional information, context or meaning to your Shell script.

For example, if you want to execute a script that is creating three different users, you can provide the user names as arguments to your Shell script.

$ create-user john jack jim

In this case, the three names are passed as arguments to the Shell script and they can be used inside the script as variables.

In order to have access to the value of the argument provided, you can simply reference them as ${1} for the first argument, ${2} for the second argument and so on.

The ${0} refers to the path to the script currently being executed.

As a example, if you try to see the value of the first argument in your script, you would write

#!/bin/bash

echo "The first argument passed to the script is ${1}"

# This line will display "john"

Shell Special Parameters

In our previous tutorial, we already discovered some of the shell special variables when learning about exit statuses.

So what are Shell special variables?

Shell special variables are read-only variables that are created by Bash in order to store values such as the last exit status or the arguments provided by the user to the command-line.

In order to have a look at Shell special variables, you have to open the documentation for the bash command.

$ man bash

When you are inside the documentation, hit the forward slash “/” and look for “Special Parameters“.

There you will be presented with a complete section as well as a description of all the Shell special parameters.

Shell Special Parameters special

In our case, we are only interested in a couple of Shell special parameters :

  • ? : results in the exit status of the last executed command (as a reminder, 0 for success and 1 for error)
$ echo "This is a successful command"

$ echo ${?}
0
  • # : describes the number of positional arguments provided to the command;
$ ./myscript "First argument" "Second argument"

Number of arguments provided is 2
  • @ : expands the positional arguments provided into a space-separated list of arguments. Arguments provided in quotes are preserved;
  • * : expands the positional arguments provided into one single string of arguments. Arguments provided in quotes are expanded;
  • 0 : provides the script name or the path to the script being executed.

Now, what would is the purpose of Shell special variables?

Shell special variables can be used with loops in order to iterate over all arguments provided to a Shell script for example.

This is what we are going to illustrate in our next section.

Using For Loops in Bash

The “FOR” statement is a shell keyword and it is used in order to iterate over a list and execute actions for every item on that list.

In order to get some help related to the “for” keyword, use the help command.

$ help for

Using For Loops in Bash

As you can see, the for loop expects a list of words to be provided in order to iterate over it.

For each iteration, the commands specified will be executed.

for X in WORDS
do
  COMMANDS
done

As a quick example, you can provide a list of strings separated by white spaces to the for loop and echo the result to the standard output.

$ for X in "First" "Second" "Third"
> do
> echo $X
> done

First
Second 
Third

In this case, using the for loop is not very useful, but it can be very useful when combined with Shell special parameters.

Let’s say for example that you want to iterate over the list of arguments provided to the command-line.

Instead of having to guess how many arguments were provided, you can use the for loop with the “${@}” special variable.

If for example you want to create a user for every username provided to the command-line, you can use the for loop to that effect.

#!/bin/bash

for USERNAME in ${@}
do
  echo "Created username ${USERNAME}"
done

Using For Loops in Bash john-jack

Awesome!

You know how you can iterate over the argument list provided to your script now.

Now that you understand “for” loops better, you are ready to learn about “while” loops.

Using While Loops in Bash

The “WHILE” statement is a shell keyword that evaluates a condition and executes a statement if the condition evaluates to true.

The “WHILE” statement lasts until the condition evaluates to false at some point.

while [[ condition ]]
do
  COMMANDS
done

As an example, let’s assign a value to the X variable and print the value of X until X is lower than 1.

#!/bin/bash

X=3
while [[ ${X} -ge 1 ]]
do
  echo "Value of X is ${X}
  X=$((X-1))
done

On the first iteration, X will be equal to 3 thus returning true to the condition specified in the while loop.

On every iteration of the while loop, the X variable will decrease by one, reaching a value lower than 1 at some point.

When X is lower than 1, the condition will return false and the while loop will simply exit.

Needless to say that other conditional statements such as “IF” or loops such as “FOR” can be imbricated into a while loop to create complex scripts.

While Infinite Loop

As described in the introduction, the while loop keeps on evaluating until the condition set evaluates to false.

This is quite important because it unveils one of the inherent problems of the while loop : it can lead to infinite loops.

Infinite loops are loops that are running indefinitely and that never stop.

They are often caused by a badly designed condition and they will prevent your script from finishing its execution.

In order to illustrate infinite loops, let’s take a look at the following loop.

X=1
while [[ ${X} -eq 1 ]]
do
  echo "Value of X is ${X}"
done

While Infinite Loop infinite-loop

As you can see, in this case, the script will keep on evaluating forever unless you shut the process down using Ctrl + C.

Now that you have a better understanding of the while loop, let’s see how you can use the “case” statement in order to create complex conditional statements.

Case Statement Explained

The case statement is a popular statement used in many programming languages.

The case statement is a shell expression used in order to match patterns and execute matching conditions.

The syntax of the case statement is as follows.

Case Statement Explained

case <pattern> in
  option1)
    COMMAND
    ;;
  option2)
    COMMAND
    ;;
  *)
    COMMAND
    ;;
esac

As an example, let’s say that you want to want to create a script that is able to interpret commands such as “start”, “finish” or “restart” provided as a script argument.

In order to match those commands, you can use the “${1}” special variable (in order to capture the first positional argument) and match it against a list of predefined commands.

Using the case command in a script, this would give us the following output

Case Statement Explained 1

case "${1}" in
  start)
    echo "You executed start"
    ;;
  finish)
    echo "You executed finish"
    ;;
  restart)
    echo "You executed restart"
    ;;
  *)
    echo "You provided an unknown command to the script"
esac

Case Statement Explained case

Providing conditional matching in case

In some cases, you want the case statements to be a little more permissive than they are.

You may want them to match multiple expressions for example, or to match text starting with a given string.

Luckily for you, the case statement understands globbing characters.

You can have a look at the Pattern Matching section of the bash documentation.

Providing conditional matching in case pattern-matching

Using this section, you can specify that you want to match multiple patterns under the same statement using the “|” operator.

case <pattern> in
  option1|option2)
    COMMAND
    ;;
  option3)
    COMMAND
    ;;
  *)
    COMMAND
    ;;
esac

You can also provide patterns that begin with a defined string and have the “*” operator match the rest of the pattern.

case <pattern> in
  opt*)
    COMMAND
  *)
    COMMAND
    ;;
esac

Now that you learnt about the case statement, you are ready to parse Shell script options using the getopts command.

Parsing script options using getopts

In order to parse script options, you need to know how to use the case statement and the while statement.

Pretty much as all the commands we used before, getopts is a Shell built-in and its documentation can be read using the help command.

$ help getopts

Parsing script options using getopts getopts

In order to use the getopts command, you have to combine the while statement and the case statement.

The syntax of the getopts command is as follows

The syntax of the getopts command is as follows

while getopts <options> <variable>
do
  case "$OPTION" in
    option)
      <command>
      ;;
    option_two)
      <command>
      ;;
    *)
      <command>
      ;;
  esac
done

As a quick example, let’s say that you want to be able to have the “-a” option and the “-b” option for your script.

As the beginning of the script, you would write the following getopts statement.

The syntax of the getopts command is as follows 1

while getopts "ab" FLAG
do
  case "${FLAG}" in
    a)
      echo "You provided a to the script"
      ;;
    b)
      echo "You provided b to the script"
      ;;
    *)
      echo "Unknown usage, provide a or b to the script"
      ;;
  esac
done

Parsing script options using getopts flags

Bash options arguments

In some cases, you may want to provide arguments to the options that you are giving to your Shell script.

Say for example that you want to have a “-n” option and provide a number for it.

In order to indicate that you expect an argument to your option, you have to append a “:” character right after your option.

while getopts "<option>:<option2>" VARIABLE
do
  <commands>
done

Given the example we wrote just before, in order to indicate that the “a” flag expects an argument, you would write the following script.

Bash options arguments

while getopts "a:b" FLAG
do
  case "${FLAG}" in
    a)
      echo "You provided a to the script"
      ;;
    b)
      echo "You provided b to the script"
      ;;
    *)
      echo "Unknown usage, provide a or b to the script"
      ;;
  esac
done

Now, when trying to execute your script with the “a” option, you will be presented with an error if you don’t provide an argument to the option.
Bash options arguments script-arguments

Accessing Bash options arguments

Now declaring arguments for your options is great, but accessing their values would be even greater.

In order to accede to the value of the argument provided to the option, you can use the ${OPTARG} special variable.

Back to our previous example, let’s try to have a look at the value provided by the user.

Accessing Bash options arguments

while getopts "a:b" FLAG
do
  case "${FLAG}" in
    a)
      echo "You provided a to the script"
      echo "You gave ${OPTARG} to the a option."
      ;;
    b)
      echo "You provided b to the script"
      ;;
    *)
      echo "Unknown usage, provide a or b to the script"
      ;;
  esac
done

Accessing Bash options arguments option-value

Awesome!

You finally know how you can retrieve arguments provided to your options.

Bash Functions

For the last chapter of this complete Bash scripting guide, we are going to take a look at Bash functions.

So what are Bash functions?

Bash functions usually store multiple commands and they are used in order to factorize and re-use code in multiple places.

Declaring Bash Functions

In order to declare a Bash function, provide the name of the function with left and right parenthesis right after the Bash function name.

#!/bin/bash

my_function() {

  <command1>
  <command2>
  <command3>

}

Alternatively, you can simply provide the function name but you need to write the keyword “function” before the function name.

#!/bin/bash

function my_function {

  <command1>
  <command2>
  <command3

}

As an example, let’s say that you want to declare a Bash function that sends a static log message to your log files.

In order to achieve that, you would write the following function.

log_to_file() {

   logger -p local0.notice "This is a message coming from a Bash function"
   echo "Correctly recorded a message in the system logs"
}

Executing Bash Functions

Now that your Bash functions are defined, you will need to call them in order to execute the code that they store.

In order to execute Bash functions, simply write the function name where you want them to be called.

Executing Bash Functions

#!/bin/bash

# Declaring a Bash function

log_to_file() {

   logger -p local0.notice "This is a message coming from a Bash function"
   echo "Correctly recorded a message in the system logs"
}

# Executing a Bash function

log_to_file

Executing this script would give you the following output

$ Correctly recorded a message in the system logs

Bash Functions Arguments

Having Bash functions just executing simple static commands is not very beneficial.

In most cases, you want to be able to pass function arguments in order to dynamically execute functions.

In a Bash script, when you want to access the arguments provided to the script, you can use the “${1}”, ${2}” and so on notation.

When running a Bash function, you can use the exact same syntax to have references to the function arguments.

#!/bin/bash

repeat() {
  echo "You said ${1}"
}

repeat "Linux"

Executing this command would give you the following output

$ ./script

"You said Linux"

Conclusion

In this tutorial, you learnt advanced features of the Bash scripting language.

You learnt about positional arguments and about Bash special variables.

You are also now able to execute simple Bash loops such as the for and the while loops.

Finally, you can now design scripts that accept options and that contain functions in them.

If you are interested in Bash or in Linux System Administration, make sure to read our other tutorials on the subject.


Find Files and Directories on Linux Easily

This tutorial focuses on how to find files on Linux using the find and the locate command.

As a system administrator, it is a very common task to look for a specific file on your file system.

However, it might be sometimes hard to find files on a Linux filesystem especially if you have dozens of different users.

There are two commands that can help you achieve your goal : find and locate.

In this tutorial, we are going to see how to use those commands effectively and how they can be tuned to achieve what we are looking for.

Find Files using the Find command

The first way to find and locate files on a Linux host is to use the find command.

By default, the find command is available on all distributions and it has the following syntax

$ find <options> <path> <expression>
Quick tip : do you have some trouble remembering if path or expression comes first?

Remember that for the grEP is Expression Path, and find is the opposite, so Path Expression!

Find is a pretty powerful command as it has way more options than the locate command.

Here are all the possibilities of the find function on Linux.

Find files with find by filename

The most common usage of the find function is to locate files given their filenames.

$ find <path> -name <pattern>

The main difference between find and locate when it comes to searching for files is that find will lookup for filenames while locate will look for paths to the file.

For example, if we go back to the runlevel example we used before, here’s how to look for runlevel files using the find command.

$ find / -name runlevel*

Find files with find by filename find-name

What’s the “2> /dev/null” part?

I redirected the error output to /dev/null using output redirection to avoid error messages on the console.

Find files using find by filetype

As we previously discussed in our article on hard and soft links, files are assigned file types and it is used as a way to differentiate them.

Here is a recap of all the file types used on Linux.

  • f : a standard file
  • d : a folder or directory
  • l : a symbolic link or soft link
  • b : block devices (such as a hard drive for example)
  • c : character devices (serial ports, sound cards)
  • p : named pipe
  • s : socket

Knowing all those file types, you are now able to search for files by file type with the find command.

$ find <path> -type <filetype>

For example, if we search for all the symbolic links on the host, we would issue the following command.

$ find / -type l

Parameters can be combined, for example if I am looking for all symbolic links whose filenames are ending with “.service” (to isolate all systemd services for example), I would run the following command.

$ find / -type l -name *.service

Find files using find by filetype combining-parameters-find

Find files using a pattern (for extensions)

Similarly to the locate command, you are able to find files on Linux using a pattern.

As a reminder, a pattern is a string that includes globbing characters (such as *, ?, or ranges).

This option is particularly when you are trying to find files given an extension, for example Javascript files.

To find files on Linux using a pattern, run the following command

$ find <path> -name ".<extension>"
$ find / -name "*.js"

Find files using a pattern files-by-extension

Files files on Linux by owner

Sometimes, you want to isolate files created by a certain user.

When deleting a user on your host, you may want to delete all files associated with this user for example.

Sometimes, users create files out of their home directory and deleting a user home directory isn’t sufficient by itself.

As a consequence, to find files created by a certain user on Linux, run the following command

$ find <path> -user <user>

For example, to find all files owned by “john” on my host, I would run the following command.

$ find / -user john

Files files on Linux by owner john-files

Now what if I want to delete all files owned by john with a simple command?

It can be easily be achieved using the delete flag.

$ find / -user john -delete

Find files on Linux by permissions

Using the find command, you can also find and locate files that have certain permissions on your host.

$ find <path> -perm <permissions>

As a reminder, here is how file permissions work on Linux.

To find all files that have full permissions (a 777 given the binary notation), you can run the following command.

$ find / -perm 777

It can be quite handy if for security reasons you want to inspect if no files are configured with full permissions on your system.

Find files on Linux by permissions find-file-perm

Find files with find by size

Another very handy way to find and locate files on Linux is to find the find command with the size option.

The size option allows you to search for files that are exactly the size you are specifying, greater than a specific size or lower than a specific size.

To search for files by size, use the following command

$ find <path> -size <size>

The size is defined by the following prefixes :

  • c: bytes
  • b: 512-byte blocks
  • k: Kilobytes
  • M: Megabytes
  • G: Gigabytes

You can specify a “+” if you are looking for files greater than the size specified.

For example, in order to find files greater than 1 GB on your system, run the following command

$ find / -size +1G

To find files lower than 10 MBs on your system, run the following command

$ find / -size -10M

Finally, to search for files that are exactly the size specified in the query, you should not append any plus or minus prefixes to the command.

$ find / -size 1024k

The command just defined will find all files that are exactly 1024 Kbs in size on your host.

Find files on Linux by modification date

Using the find, you are also able to find files given a modification date, recent or not.

This command is very handy and used quite often by system administrators to find files or directories that have been recently modified.

To search for files using find by modification date, run the following command

$ find <path> -mtime <time>

Where time represents the files modified 24*<time> hours ago.

As a consequence, time is expressed in days.

Similarly to the size option, you can append a “plus” or a “minus” operator to the time to look for files modified more than <time> days ago, or less than <time> days ago.

For example, to look for files modified exactly 3 hours ago, you would run the following command.

$ find / -mtime 3

To find files modified more than one week ago, you would run the following command

$ find / -mtime +7

To find files modified less than two days ago, you will run the following command

$ find / -mtime -2

Find files with dynamic depth

As you probably noticed, since the beginning of this tutorial, we are giving examples of files searches starting from the root directory.

As a consequence, all folders are browsed recursively.

However, we can restrict the number of directories recursively traveled from one directory, this is called the depth.

To limit file searches to a given depth, run the following query

$ find <path> -maxdepth <depth>

As an example, here is how you can restrict files searches to the current directory, with no children directories being browsed.

$ find / -maxdepth 1

You can obviously combine this command with the name flag in order to search for files with a given name in the current directory.

$ find . -maxdepth 1 -name *.tar

Find files with dynamic depth maxdepth-find

Chaining find with -exec

In some cases, you may find useful to chain the find command with the exec one.

The exec option can be used in order to chain multiple commands together : taking the result of the first one as an input of the second one.

Let’s say for example that you want to find all files modified less than one minute ago

$ find /home/user -mmin -1
./file1

Now let’s say that you want to delete all files that were modified less than one minute ago.

You can chain the find command with the -exec option using this syntax.

$ find /home/user -mmin -1 -exec echo rm -f '{}' \;

Chaining find with -exec rm

We obviously first “echo” the results as we want to make sure that we are deleting the correct files.

When you are ready to delete those files, simply remove the echo command.

$ find /home/user -mmin -1 -exec rm -f '{}' \;

Find Files on Linux using the Locate command<

Another great way to find and locate files on Linux is to use the locate command.

Prerequisites

If the locate command in not available on your system, make sure to read the next section to get locate running on your system.

a – Installing Locate on APT and RPM based distributions

To install locate, you will need sudo privileges on your Linux host.

To check if locate is installed on your host, run the locate command in the command line.

$ locate

If locate is installed on your computer, it will expect an expression to provided

locate-installed

If locate is not installed on your host, an error message will be displayed

locate-not-installed

To install locate on Ubuntu 18.04 and Debian 10, run the following command.

$ sudo apt-get install mlocate

Similarly, if you are on a CentOS or Fedora based distribution, run the following command to install locate.

$ sudo yum install mlocate

b – Updating your mlocate database

The locate function works with a local database stored on your filesystem that stores every single filename of your host.

When performing a locate command, locate will search into the database prepared by updatedb for the file you are searching for.

Periodically, a cron job updates the mlocate.db file for you to look for the most recent entries.

The database is located at /var/lib/mlocate/mlocate.db by default and the updatedb configuration file is stored at /etc/updatedb.conf.

For now, you can leave the default options and run a simple updatedb command for your database to refresh.

$ sudo updatedb

updatedb-command

Locate files given a name pattern

The most basic way to find files on Linux is to provide a pattern to the locate command.

By default, the syntax of the locate command is the following one

$ locate [OPTION]... [PATTERN]...

If you are looking for a given configuration file on your system, an easy way to find it is to provide its complete file name to the locate command.

$ locate updatedb.conf

locate-config

As you can see, the locate command is returning the complete paths to the file I am looking for.

Locate files in restricted directories

Sometimes, you may not have access to some directories on your system.

As a consequence, you won’t be able to locate the files located into it.

Let’s take the example of a forbidden folder containing a file named “restricted-file“.

Locate files in restricted directories restricted

To locate files located on restricted directories, you have to run the locate command with sudo privileges.

$ sudo locate restricted-file

Locate files in restricted directories listing-restricted

Locate files using a pattern

Using the locate command, you can provide “patterns” in the form of globbing characters.

Globbing characters, also called wildcards, are characters used in order to match one or multiple entries with a simplified expression.

The most popular one is the “*” that will match any character including none.

Here’s a recap table for globbing characters and their functions.

Wildcard Description Example Matches Does not match
* matches any number of any characters including none devco* devconnected, devcoco, devco.com devdevco,
[abc] matches one character given in the bracket [ab]ab aab, bab cab
[a-z] matches one character from the (locale-dependent) range given in the bracket runlevel[0-9] runlevel1, runlevel2, runlevel6 runlevels, runlevelo

As an example, here’s a way to locate all text files on your system.

$ locate *.txt

locate-text-files

Locate files using a regular expression

As stated in the official man page for locate, the locate command accepts a pattern as an input.

It means that you are able to provide a regular expression to the locate command.

To find and locate files given a regex, use the –regex option for the locate command.

$ locate --regex <regex>

For example, to isolate all files starting with runlevel followed by a number, you would run the following command.

$ locate --regex runlevel[0-9]+

Locate files using a regular expression locate-regex

When using regexes, there is one important point that you should be aware of when locating files.

The locate command is looking for paths to files in its local database.

As a consequence, when searching for files, you should be aware that your regular expression has to match the path to the file and not the file name alone.

For example, if I look for files starting with “run”, no results won’t be returned as the path to the file starts with “/usr”.

locate-regex-2

Locate files using case insensitive option

When searching for files on your filesystem, you may not be sure about the way a given file was named.

Was it written in uppercase or in lowercase? Does it contain any uppercase letters at all?

To find and locate files using a case insensitive option, append the -i option to your locate command.

$ locate -i <file_pattern>

Locate files using case insensitive option case-insensitive

Search files by content using grep

In some cases, you may be interested in searching for files that are matching a specific word of sentence that is located INSIDE the file.

This may happen for example if you are trying to find the file containing specific log events.

The first way to search for files matching a specific word is by using the grep command

$ grep -r <pattern> <path>
Note : do not forget the “-r” option if you are searching files through entire directories.

For example. if you are searching all the files having “error” in their content, located in your home directory, you would type

$ grep -r error /home/user

Search files by content using grep files

In some cases, you may want to find files given a regular expression.

In order to find files using a regular expression, use the “-E” option.

$ grep -r -E <expression> <path>

Let’s say for example that you want to find the file matching the ‘abc’ pattern in one of your files, you would type

$ grep -r -E "abc.*" --color /home/user

Search files by content using grep

Note : the color option is used in order to highlight matches using the grep command.

Find files using which

Another great way to locate files on Linux is to use the which command.

The which command is used in order to locate the files associated with a specific command.

This can become very handy when you don’t know where you stored your binaries for a command or if you need to locate a command in order to add it to your PATH.

$ which <command>

For example, in order to search for files associated to the “ls” command, you would type

$ which ls
/usr/bin/ls

As you can see, you are given the complete path to the file.

Locate binaries using whereis

Similarly, it is completely possible to search for files by using the whereis command.

The “whereis” command can be seen as a superset of the “which” command : “whereis” provides information about the name of the command, the file location as well as the location of the manual pages.

To execute whereis, simply type “whereis” and append the name of your command.

$ whereis ls
ls: /usr/bin/ls /usr/share/man/man1/ls.1.gz

Pretty handy!

Conclusion

In today’s tutorial, you learnt how you can find and locate files on Linux using two important commands : locate and find.

Even if option were presented individually, you should remember that they can be combined in order to be able to specify even more the files you are looking for.

As always, if you are interested in Linux system administration, we have a complete section dedicated to Linux on our website.