Are you in a confused state to work with Add User to Sudoers CentOS? Then this tutorial on How To Add A User to Sudoers On CentOS 8 will definitely assist you through the process and clarifies all your queries regarding the concept.
Learning each and every concept right from the basis is very important and helpful. So let’s start with the definitions and their uses.
CentOS is a free and open-source Enterprise Linux distro obtained from an upstream distro known as Red Hat Enterprise Linux (RHEL). CentOS is mostly used on servers and clusters.
The sudocommand is the famous command available on Linux and it permits users to execute commands with the security privileges of another user, by default the root user. The /etc/sudoers file contains a security policy for system users and groups that is used by the sudo command.
- How To Install Docker on Ubuntu 18.04 & Debian 10
- How To Add User To Sudoers On Ubuntu 20.04
- How to Change user password in Linux
Today’s tutorial focuses on all the information about adding a user to sudoers on CentOS 8 (the most recent CentOS distribution) and also details regarding two ways of adding a user to sudoers: add it to the wheel group (similar to the sudo group on Debian-based distributions) or add the user to the sudoers file.
- Prerequisites
- Procedure to add or create a sudo user on CentOS 8
- Adding an existing user to the wheel group
- Adding an existing user to the sudoers file
- Adding a group to the sudoers file
- Quick Steps To Create a New Sudo-enabled User on CentOS 8
- Conclusion
Prerequisites
In order to grant the sudo rights to an existing user, you are going to need the sudo command on your CentOS 8 host.
First, make sure that your packages are up to date on your host and install the sudo command.
$ su -
$ yum update
$ yum install sudo
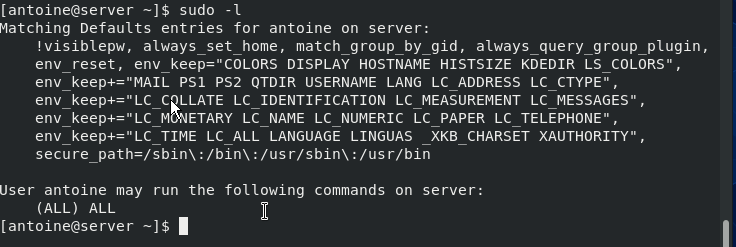
To verify that the sudo command is correctly installed, you can run the following command
$ sudo -l
Do Check Other Linux Tutorials:
- Access Control Lists on Linux Explained
- Input Output Redirection on Linux Explained
- Cron Jobs and Crontab on Linux Explained
Procedure to add or create a sudo user on CentOS 8
- Open the terminal application
- For remote CentOS Server, use the ssh command and log in as the root user using either su or sudo.
- Create a new CentOS user named tom, run:
useradd tom - Set the password, execute:
passwd tom - Make tom user sudo user on CentOS Linux 8, run:
usermod -aG wheel tom - Verify it by running the
id tomcommand
Adding an existing user to the wheel group
The first way to add a user to sudoers is to add it to the wheel group.
In order to add your user to the group, you can either use the usermod or the gpasswd command.
$ sudo usermod -aG wheel <user>
Alternatively, here is the syntax using the gpasswd command.
$ sudo gpasswd -a <user> wheel
Adding user to the group wheel
Make sure that the user belongs to the wheel group with the groups command.
$ su - <user>
(enter the password for user)

$ groups
user wheel
Alternatively, you can run the sudo command on the user you granted administrative rights.
$ sudo -l
Congratulations!
You have added a user to sudoers on CentOS 8.
During your CentOS 8 installation process, if you chose not to set a root password, your root account may be locked by default. As a consequence, you will need to set a password to the root user account if you need to unlock it.
Adding an existing user to the sudoers file
The other method to grant administrative rights is to add the user to the sudoers file.
By default, the sudoers file is located at /etc/sudoers by default.
This file contains a set of rules that are applied to determine who has administrative rights on a system, which commands they can execute with sudo privileges, and if they should be prompted a password or not.
However, you should not modify the sudoers file by yourself because if you make any mistakes during the process, you might be locked out of your host forever.
Instead of modifying the sudoers file by yourself, you are going to use visudo.
Visudo is a tool that checks the integrity and the correctness of the commands typed before saving the sudoers file.
To execute visudo, type the following command
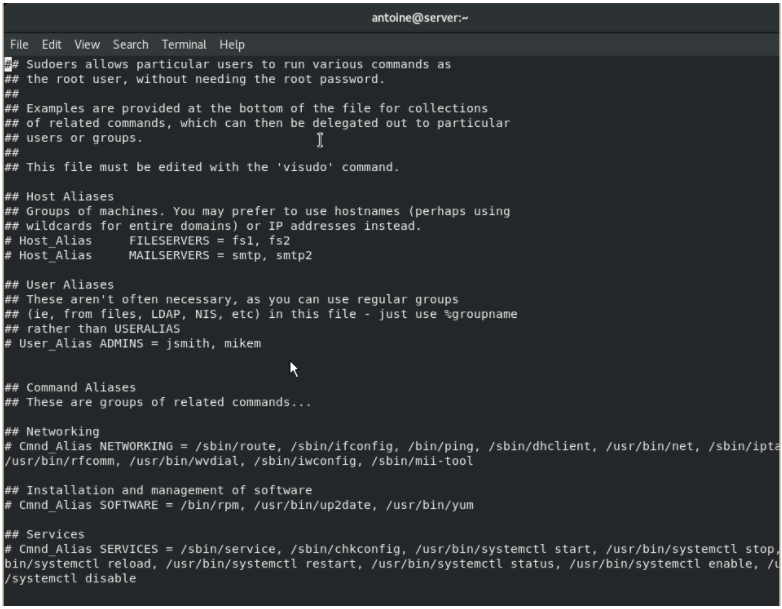
$ sudo visudo
You should now see the following screen

At the end of the file, add the following line.
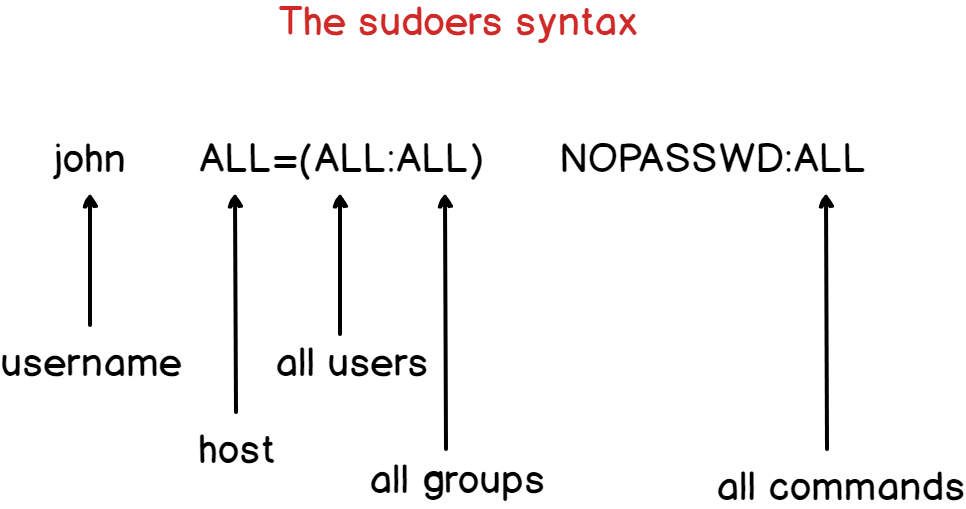
$ <user> ALL=(ALL:ALL) ALL
Here are some details about the syntax of the sudoers file.
By default, the account password will be asked every five minutes to perform sudo operations.
However, if you want to remove this password verification, you can set theNOPASSWDoption.
$ <user> ALL=(ALL:ALL) NOPASSWD:ALL
If you want to increase the password verification time, you can modify the timestamp_timeout (expressed in minutes).
In the example shown below, you will be asked to provide your user password every thirty minutes.
# /etc/sudoers
#
# This file MUST be edited with the 'visudo' command as root.
#
# See the man page for details on how to write a sudoers file.
#

Defaults        env_reset
Defaults        mail_badpass
Defaults        secure_path = /sbin:/bin:/usr/sbin:/usr/bin
Defaults        timestamp_timeout=30
Adding a group to the sudoers file
In the sudoers file, you can add a user but you can also add an entire group which can be quite handy if you want to have specific rules for different groups.
To add a group to the sudoers file, simply add a percent symbol at the beginning of the line.
$ %sysadmins ALL=(ALL:ALL) NOPASSWD:ALL
Make sure that your user is part of the designed group with the groups command.
$ su - user
$ groups
user sysadmins
Again, you can test that your changes were applied by changing your password for example
$ sudo passwd
Quick Steps To Create a New Sudo-enabled User on CentOS 8
The steps that should follow for performing how to create a new user with sudo access on CentOS 8 are given here:
- Logging Into Your Server
- Adding a New User to the System
- Adding the User to the wheel Group
- Testing sudo Access
Conclusion
In this tutorial, you learned how you can add a user to sudoers on CentOS 8, by using the usermod command or by changing the sudoers file.
If you are interested in Linux System Administration, we have dedicated a section for it on our website, kindly check it out for more information.


